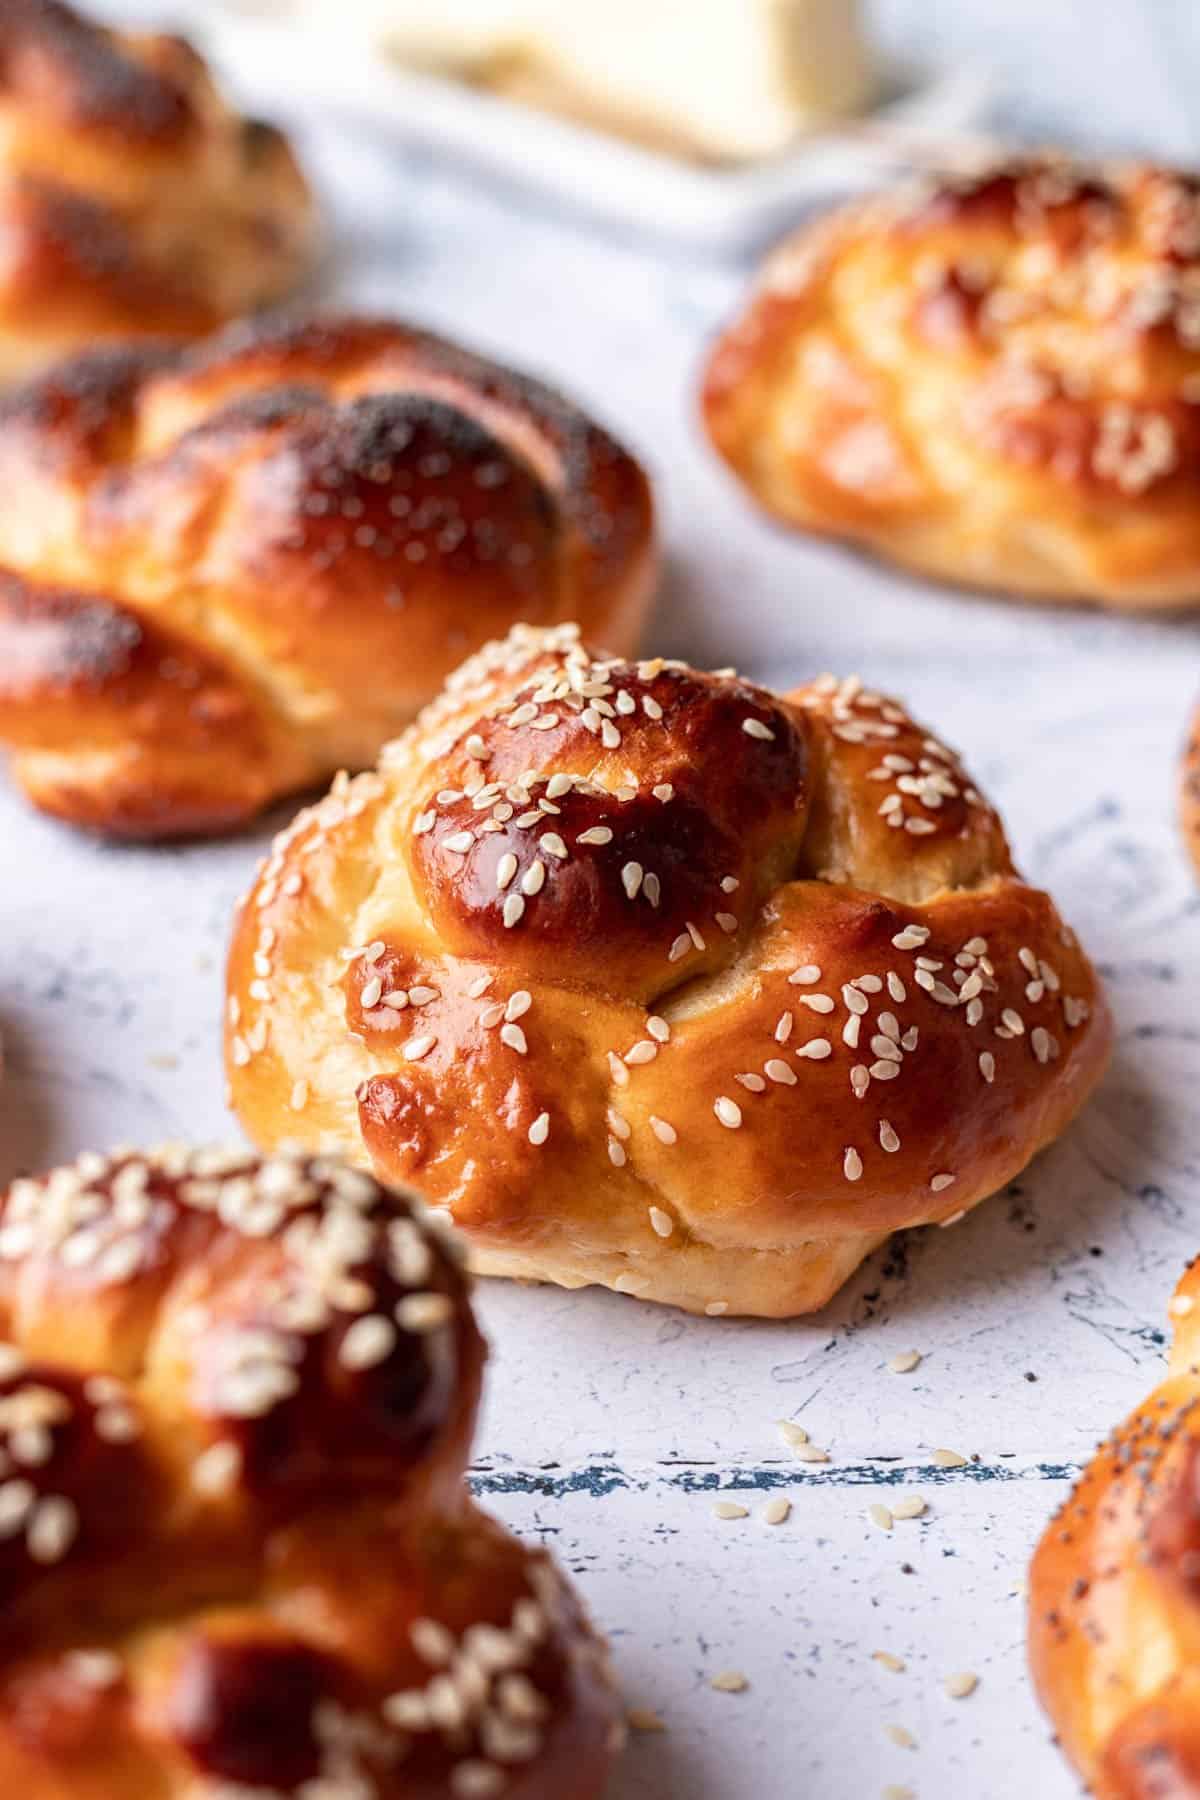
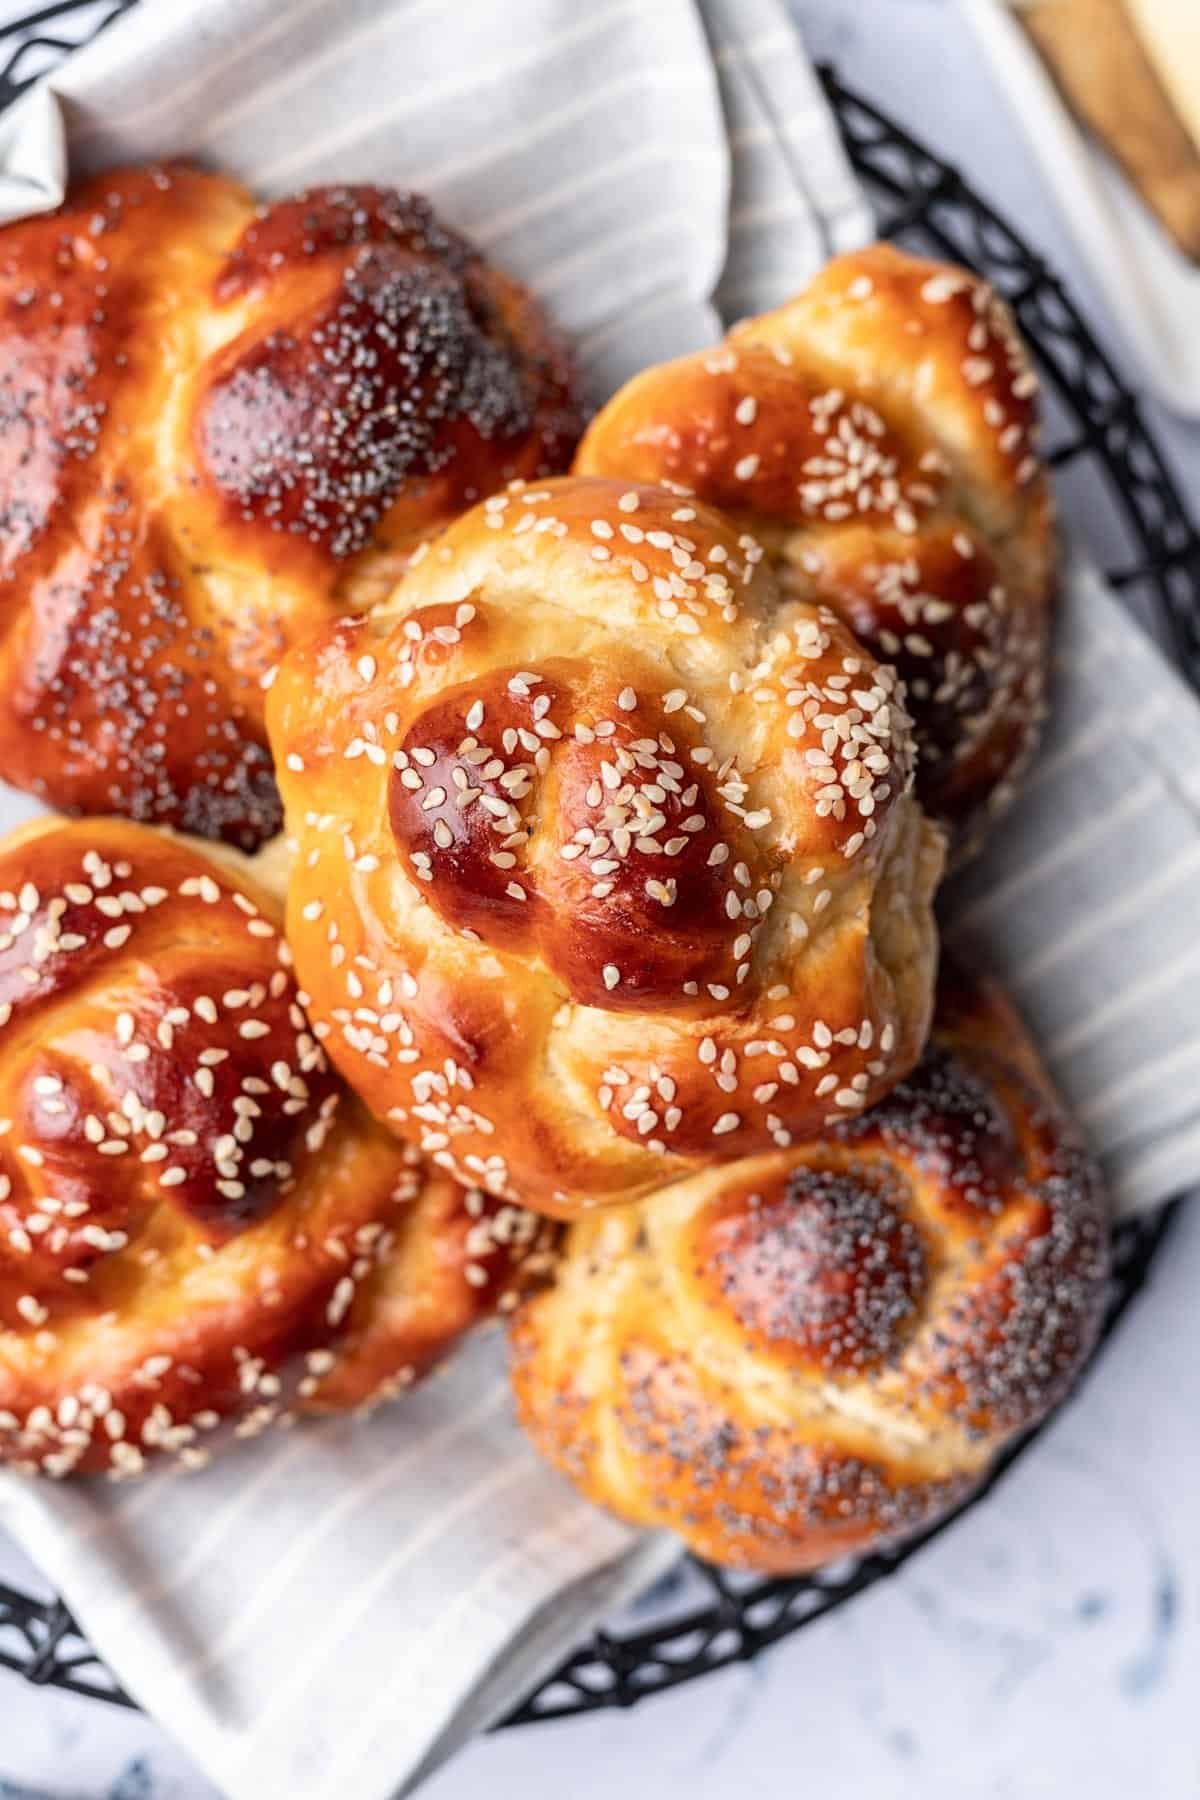
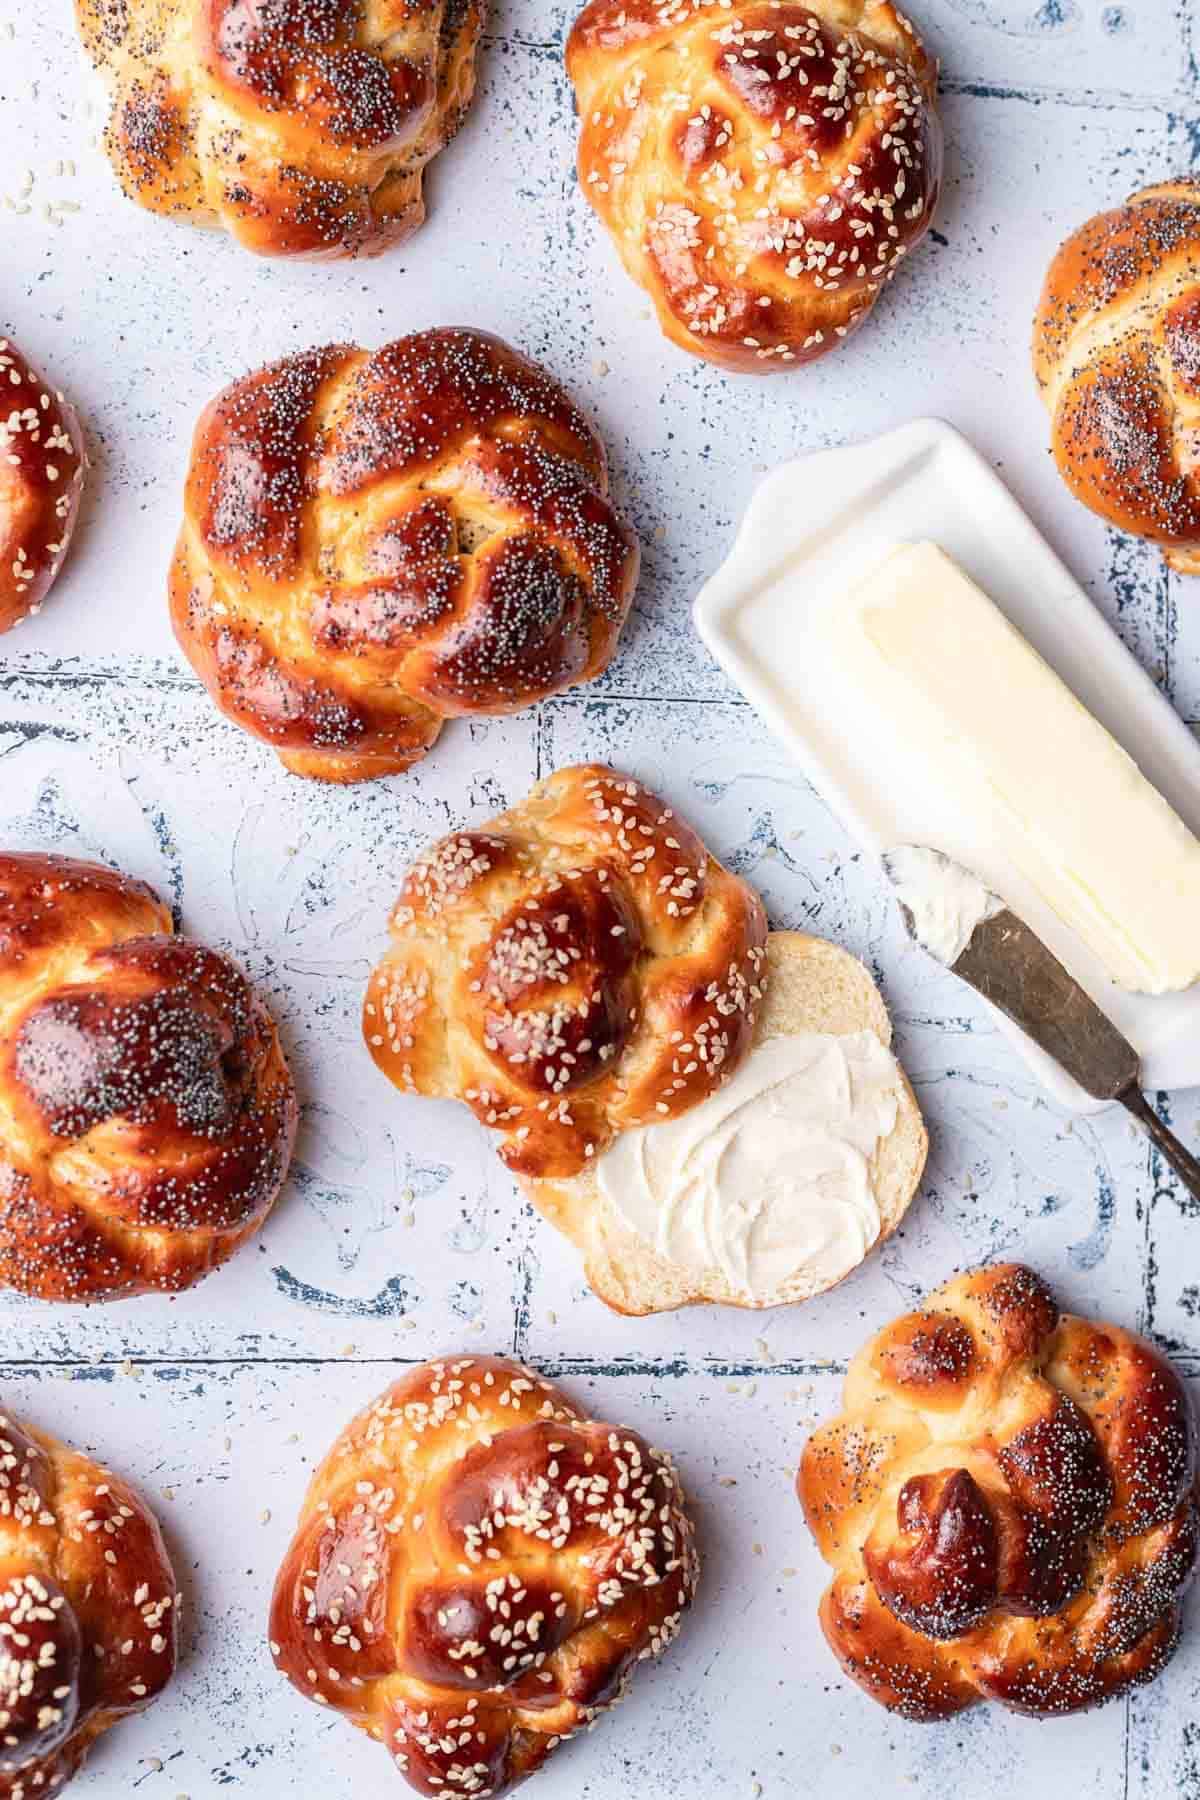
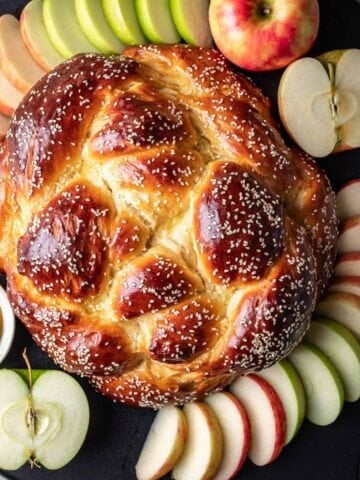
These challah rolls are light and fluffy and the perfect egg-rich bread to soak up Matzo ball soup or serve alongside your holiday feast! All you need is 6 simple ingredients to make your own mini challah rolls at home.
Jump to:
📋 About the Recipe
- Can be used as rolls or burger buns! The best thing about these challah rolls is they doubles as a dinner roll and a burger bun recipe! If you love eating burgers like my Apple Turkey Burgers, you will love the rich, fluffy flavor of challah buns.
- Goes well with several dishes. Pair these challah rolls with soups and stews, chicken meatballs, sandwiches, Jewish favorites and more. You can even cube them and turn the rolls into fresh toast casserole or homemade croutons.
- Freezer friendly! Pop a batch of these challah buns in the freezer and defrost 1 or 2 whenever you need an additional dinner side. Easy and convenient without food waste!
🛒 Ingredients
A few notes about the ingredients:
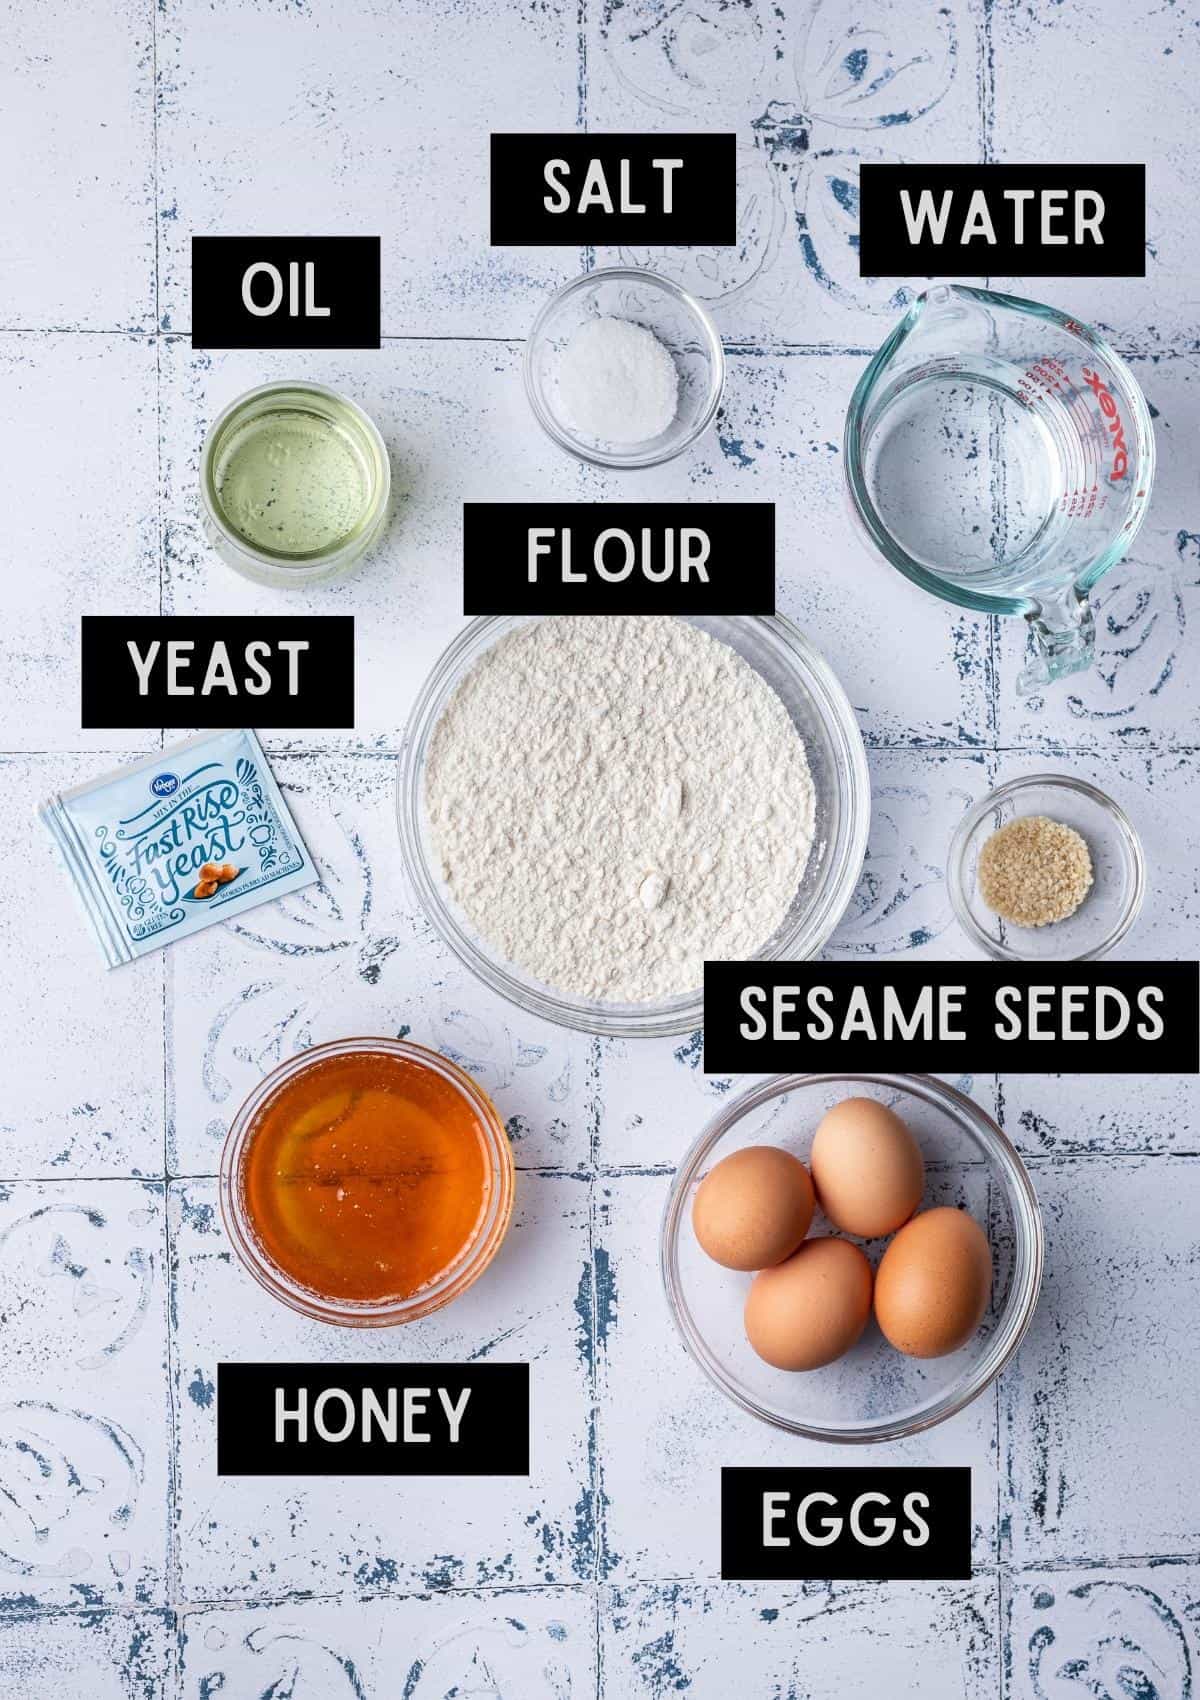
- Flour - Just like in my round challah recipe, I only recommend using all-purpose flour. It yields the most traditional, light and fluffy challah. I have not tested these rolls using another flour or gluten-free flour blend and cannot recommend one.
- Yeast - I purposefully developed this recipe using instant yeast to make it fool proof. Instant yeast does not need to be bloomed ahead of time and can be added to the mix of dry ingredients, just like the flour and salt.
- Honey - Honey is a popular liquid sweetener in Jewish baking, particular for holidays like Rosh Hashanah because honey symbolizes a “sweet new year.”
- Oil - I highly recommend making these rolls using a neutral oil like vegetable oil. A neutral oil won’t overpower the flavor of the challah buns and keeps this dough light and fluffy.
- Eggs - Challah is nicknamed “egg bread” making eggs and egg yolks an essential in making traditional tasting challah rolls! You’ll need eggs for the challah rolls dough as well as for brushing on the braided challah to make them perfectly golden.
- Sesame seeds - Optional, but adds a pretty final touch and a bit of texture to the challah rolls (similar to burger buns)! You could also try poppy seeds or a similar, small seed or herb.
⁉️ Substitutions and Alterations
There aren't many ingredient substitutions or alterations I’d suggest when making this challah recipe because it already uses such basic ingredients that are essential to home baking.
The only alteration I’d suggest is making smaller challah rolls. This recipe makes 10 4-inch challah rolls. If you'd like smaller dinner rolls, divide the dough into 15 balls instead of 10. Keep in mind, smaller rolls will require a shorter bake, so keep an eye on them and adjust the timing as needed.
📓 Instructions
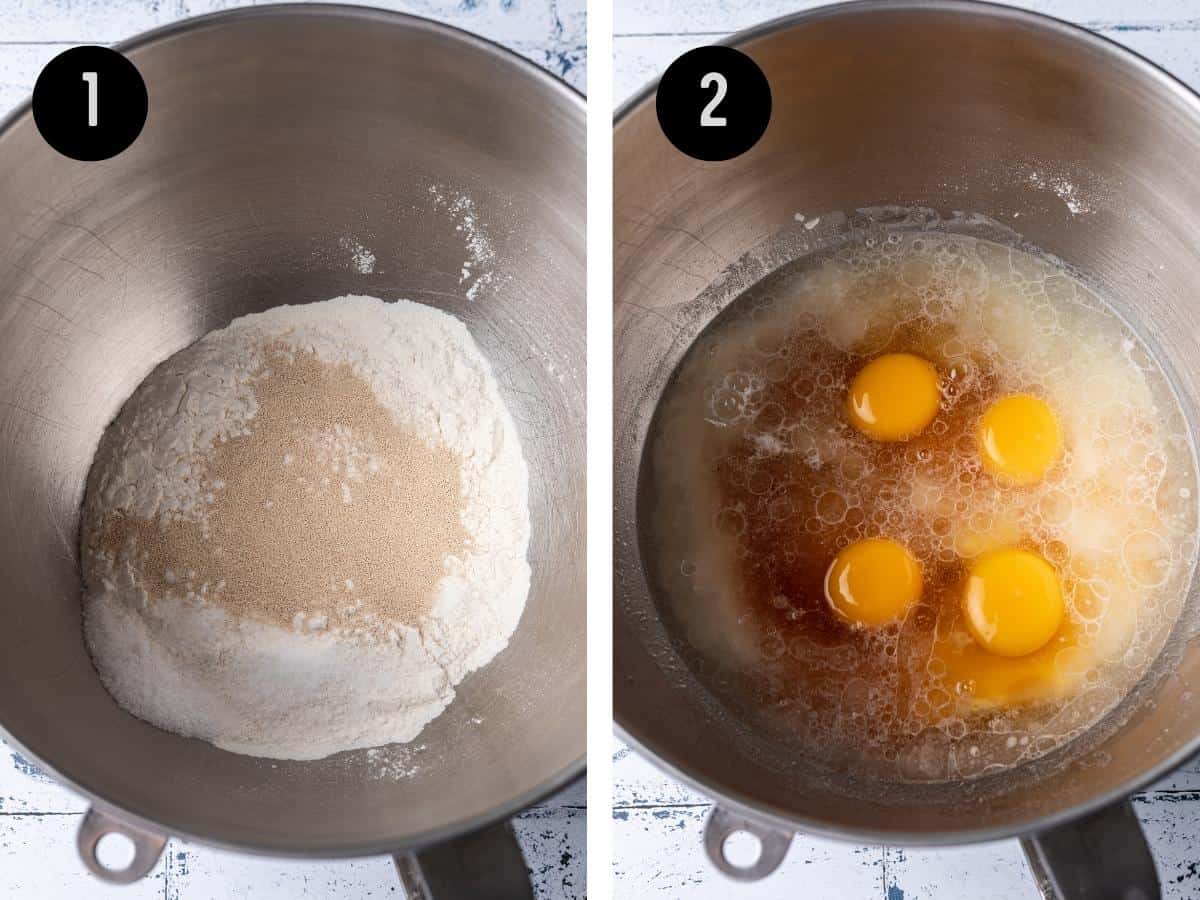
- Combine dry ingredients. In the bowl of a stand mixer, add 2 cups flour, yeast, and salt. Lightly mix together with a spoon.
- Add wet ingredients. Once mixed, add in lukewarm water, honey, oil, 3 eggs and 1 yolk. Using the dough hook, mix on medium-low speed until combined. Scrape the sides of the stand mixer as needed. This mixture should form a wet batter.
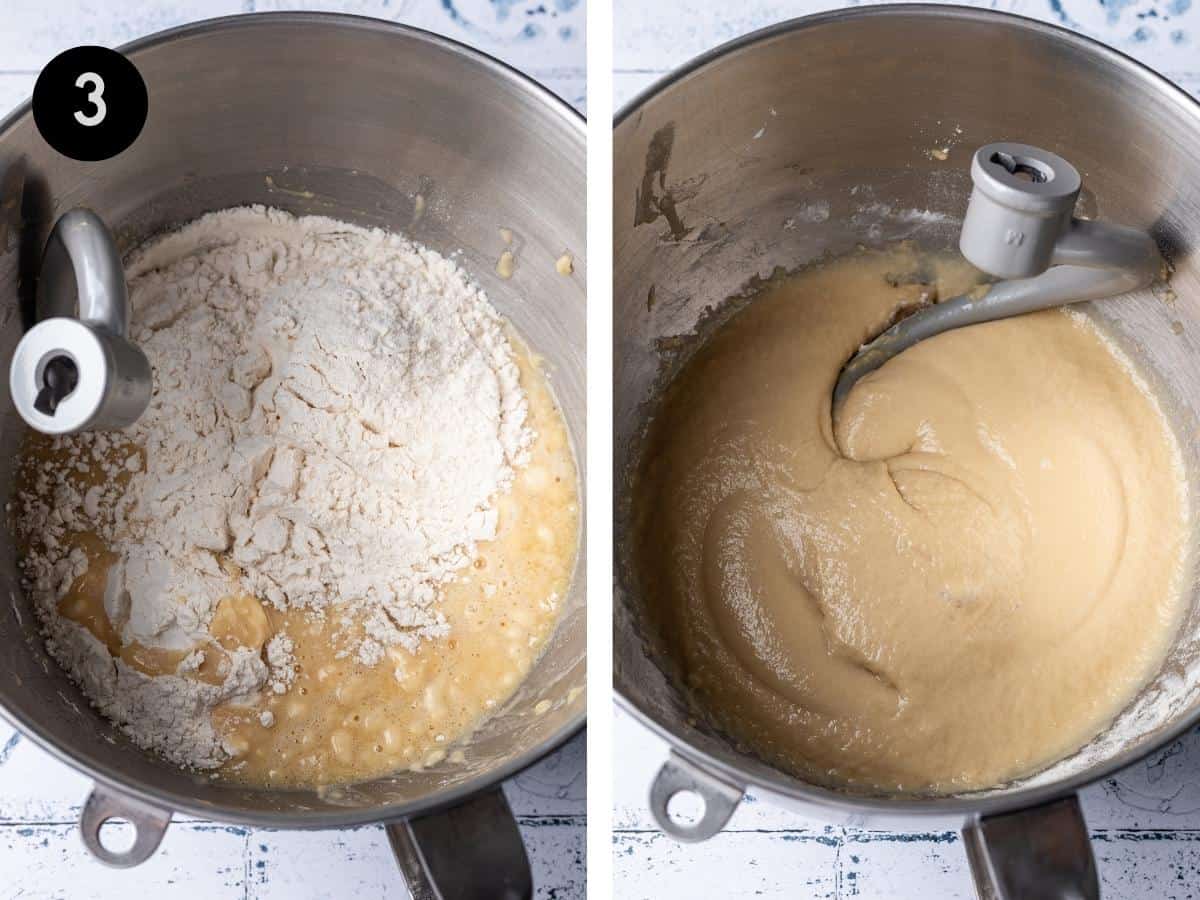
- Add 2 ½ cups of additional flour. Using the dough hook, continue to mix on medium speed until the challah rolls dough thickens and becomes sticky. This will take roughly 15 to 20 minutes. Again, stop the stand mixer and scrape the sides of the bowl as needed.
- Knead the challah dough. On a large, clean work surface, sprinkle ¼ to ½ cup of flour over to prevent the dough from sticking. Scoop the dough out of the stand mixer and knead it on the clean, floured work surface for 10 to 20 minutes, or until the dough absorbs all the flour and becomes smooth, elastic, and minimally sticky.
- Grease a large bowl. Add 1 tablespoon of additional vegetable oil to a clean bowl. Add the kneaded dough and coat in the oil on all sides.
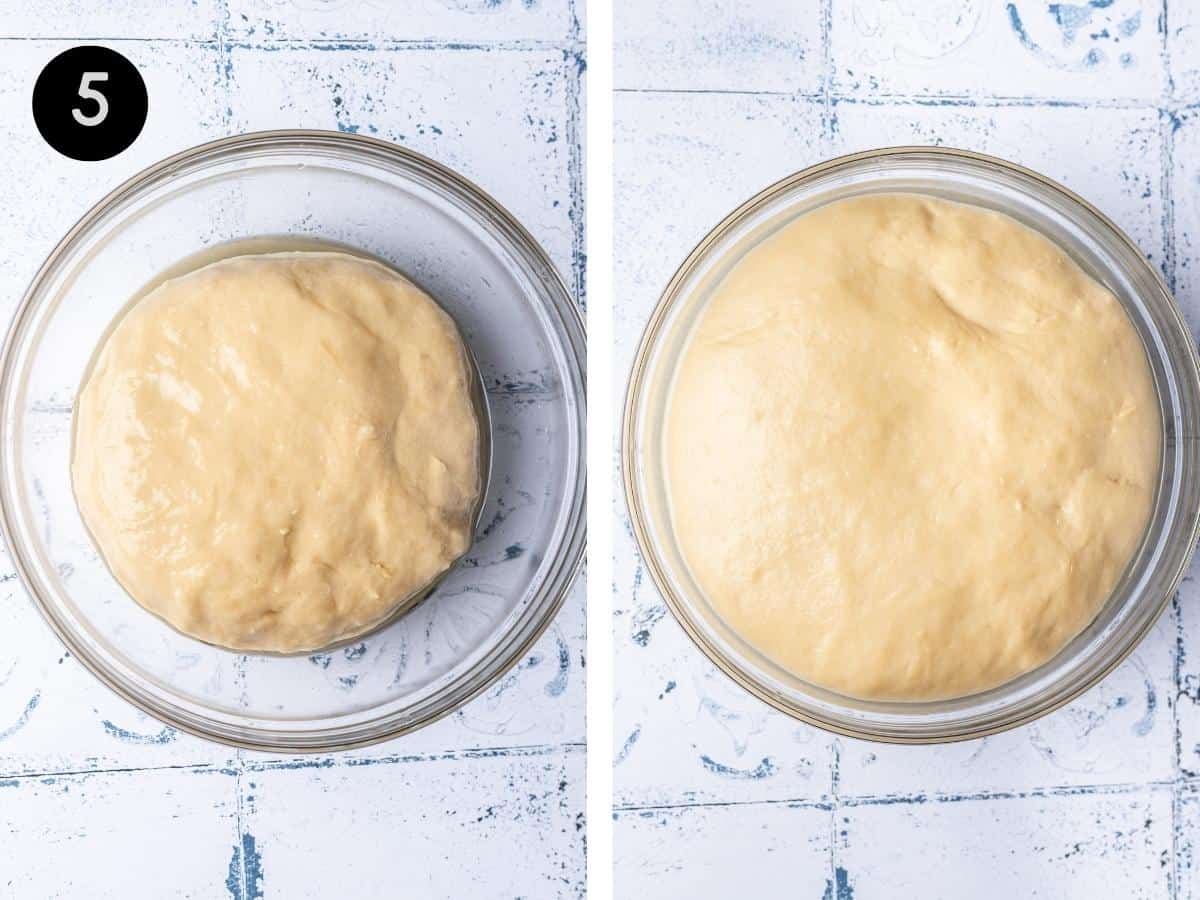
- Allow the challah bun dough to rise. Cover the bowl with plastic wrap or a clean tea towel and rest the dough for 2 hours, or until it has doubled in size.
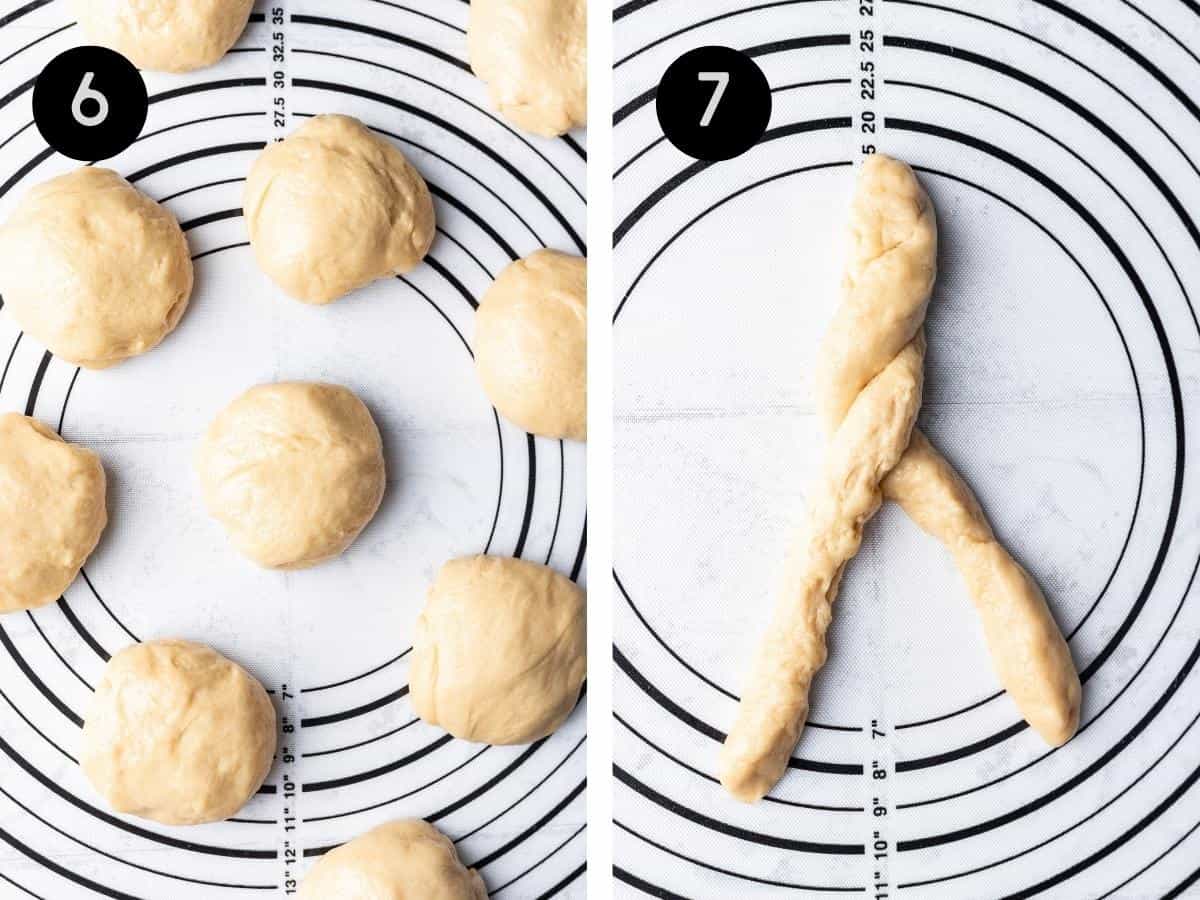
- Cut the dough into 10 pieces. After the dough has doubled in size, turn the dough out from the bowl and split into 10 even-sized pieces. Roll each piece into a round ball.
Roll each ball into two long strands. Working with 1 ball at a time, split the ball into two equal parts. Roll each halve into two 12-inch long strands.
Twist the two strands together. Then once twisted, swirl the entire twist into a spiral ball by rolling the bottom up into itself.
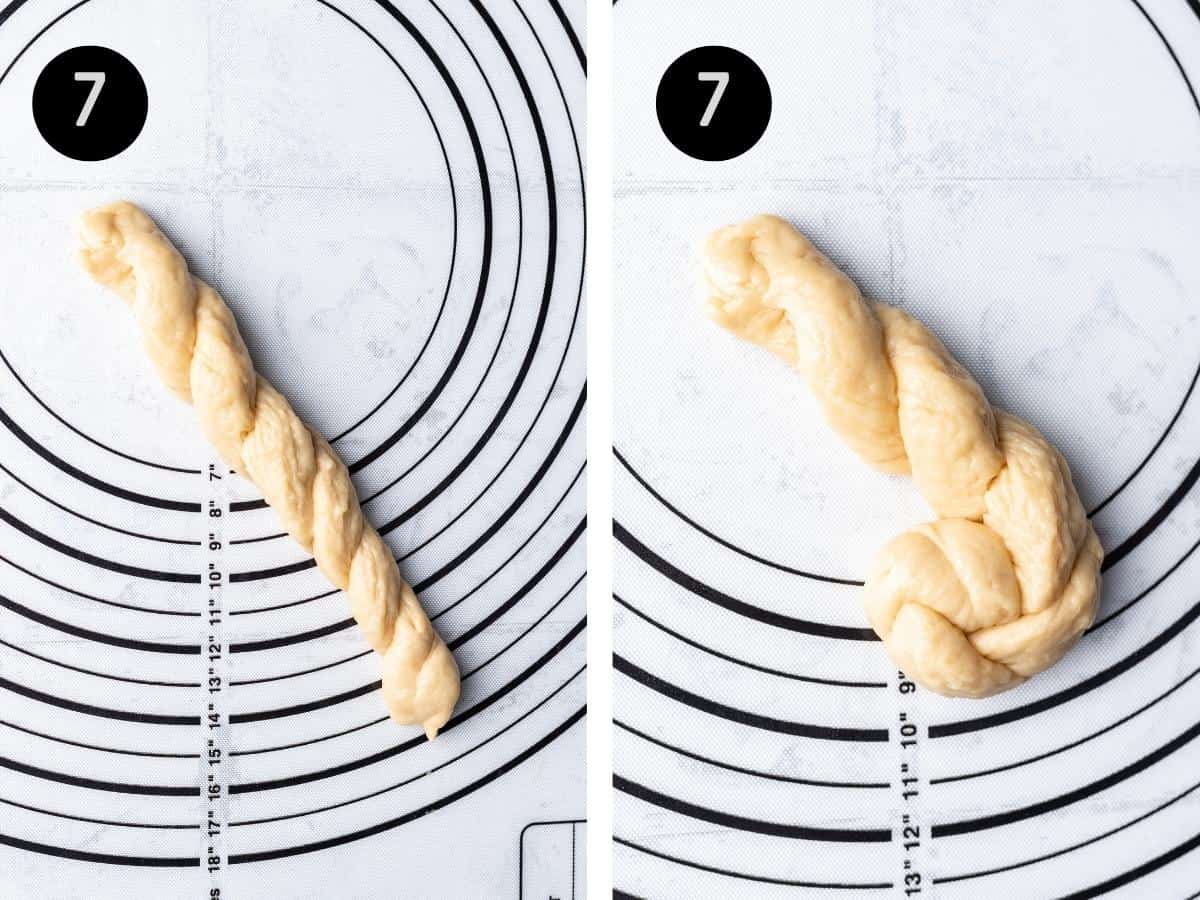
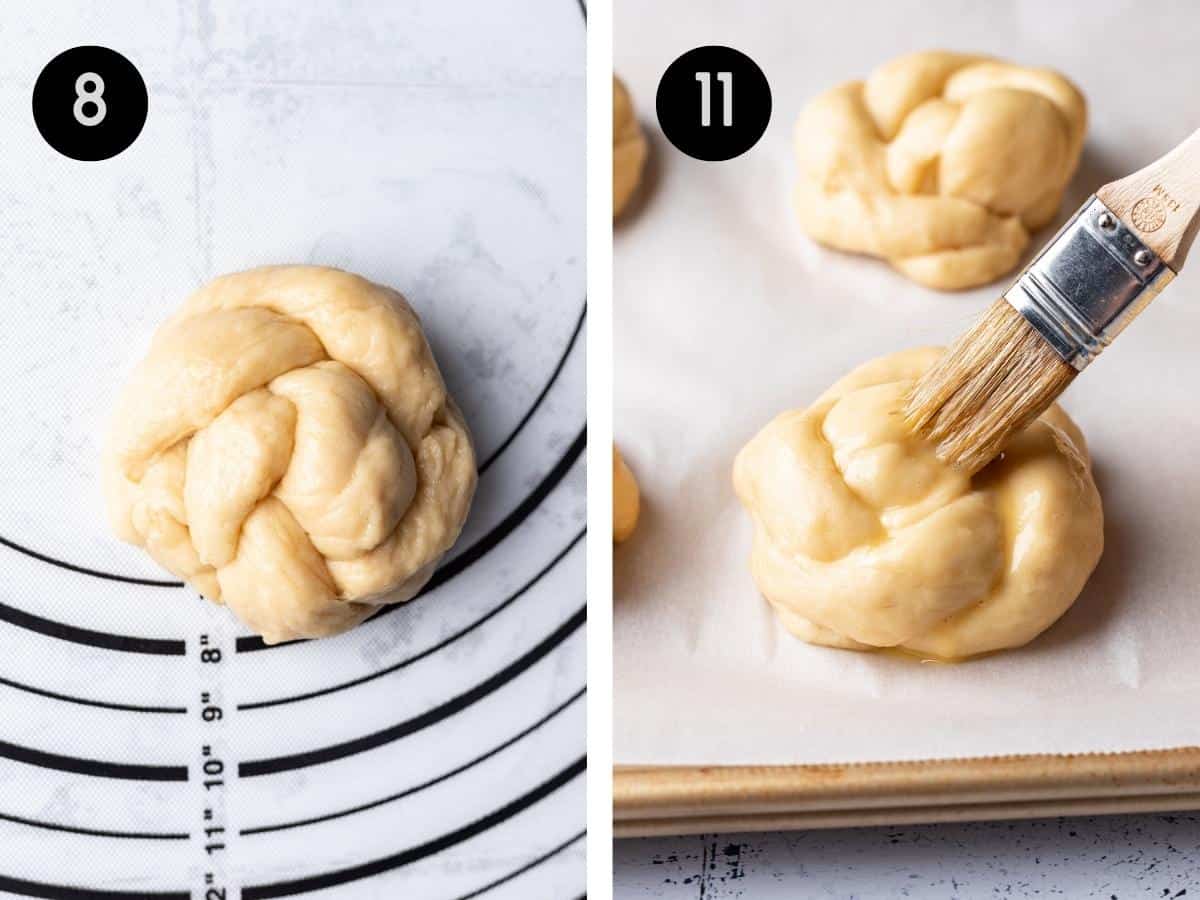
- Tuck the end of the strand under the challah bun. Complete the circle by tucking the remaining end under the roll. Repeat with the rest of the dough balls until you have 10 spiraled challah rolls.
- Rise again. Carefully transfer each roll of dough onto two parchment-lined baking sheets. Cover loosely with plastic wrap or a clean tea towel and rise in a warm place for another 1 to 2 hours, or until it is about 1 ½ times its original size.
- Preheat the oven. Near the end of the second rise, preheat the oven to 350 degrees F and check that your oven racks are spaced enough to allow the challah buns to rise further in the oven.
- Make the egg wash. In a small bowl, whisk 1 egg until combined. Brush egg wash liberally over each risen challah bun.
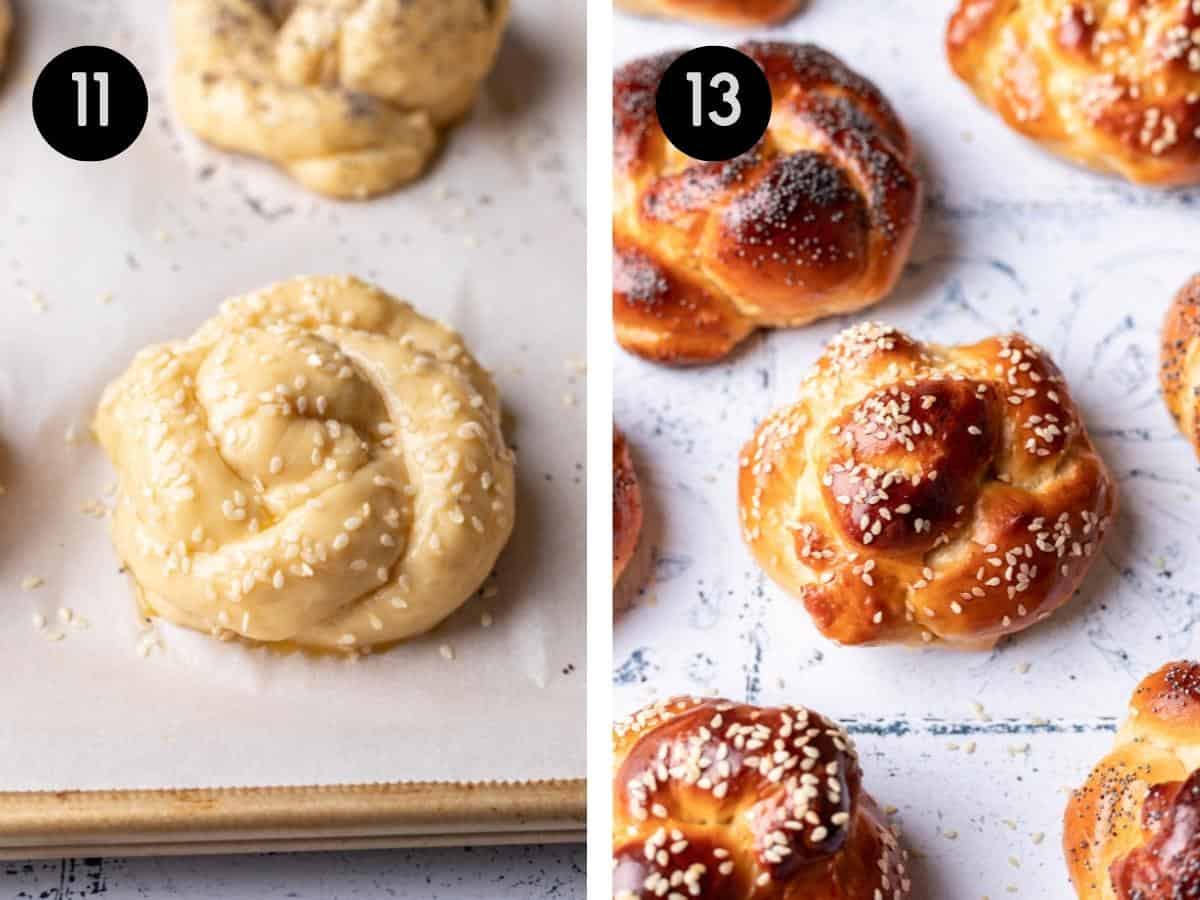
- Sprinkle with sesame seeds. If desired, sprinkle the tops of the rolls with sesame seeds, poppy seeds or another small seed.
- Double up the baking sheets. Double the baking sheets by placing the baking sheets with the dough, on top of another same-sized baking sheet. This will help protect the bottom of the bread from browning too quickly. Place the doubled baking sheets in the oven.
- Bake! Bake the challah rolls for 15 to 20 minutes, or until golden brown on top and a thermometer inserted into the center of the rolls reads 190 to 200 degrees F.
Cool on a cooling rack. Once baked, remove the challah rolls from the oven and place on a cooling rack to cool to room temperature.
*For challah buns, simply slice the rolls in half horizontally!
❄️ How to Store
To store: Store leftover challah rolls in an airtight container at room temperature for up to 4 days. Refrigeration is not recommended - this makes the challah rolls go stale and become very dense.
To freeze: Leftover challah rolls can be frozen in an airtight container or zip top bag for up to 3 months. To do so, tightly wrap each individual roll in plastic wrap, then transfer to a freezer safe zip top bag or container.
When ready to thaw, place the challah rolls on the counter at room temperature and enjoy as usual.
🔍 FAQs
Challah differs from regular bread in that it is pareve Kosher (not made with dairy or butter) and is typically richer in taste than traditional loves of bread, such as sourdough or wheat. This is because challah is made with several eggs, and is more similar in richness and taste to brioche.
They can be, but this challah rolls recipe is more neutral tasting like typical bread. This makes it suitable for all types of recipes, sweet and savory.
Challah bread is eaten for several Jewish holidays and occasions including Shabbat, Rosh Hashanah, breaking the Yom Kippur fast, and more. The one exception to this list is Passover, as leavened breads are prohibited.
These rolls would also be a great addition to any Thanksgiving feast!
Yes, challah dough can be over proofed if it is left to rise in a warm, draft free area for longer than recommended. If necessary, stick the challah in the refrigerator to rise overnight instead (on the first rise, not the second). This will prevent your bread from over proofing and works great if you need to give yourself some extra time.
You can’t leave challah buns to rise in a warm place overnight, but you can rise it overnight in the refrigerator, if desired. To do so, follow recipe steps 1 through 8, then place the challah into the refrigerator to rise overnight as opposed to 2 to 3 hours in a warm spot.
The next morning, remove the challah from the refrigerator, allow it to come to room temperature, then carry on with the remaining steps. For this method, please use plastic wrap as opposed to a clean tea towel to prevent the challah dough from drying out in the refrigerator.
💭 A Few More Tips
- Use warm, not hot water in the dough! Although instant yeast does not require a separate proofing step, it still needs to be activated with warm water. To activate the yeast properly, use warm bath water (about 120 degrees F). If the water is too cold, the yeast won’t become active. If the water is too hot, the yeast will be killed and won’t rise the challah rolls.
- Use your Instant Pot to proof the dough! The ideal rising temperature for challah rolls is between 78 and 80 degrees F. If your house is colder, the challah will still double in size, but will take much longer. In the colder months, try proofing the dough in the Instant Pot using the yogurt setting. Or, place the bowl in the oven with the oven light on. The warmth from the bulb will do the trick!
- Spray your measuring cup with oil when measuring honey. This will prevent sticking and make for an easier cleanup.
🍴 Related Recipes
Share your cooking with me! If you make this recipe, I'd love to know! Tag @yourhomemadehealthy on Instagram or leave a comment with a rating and some feedback at the bottom of this page!

Challah Rolls (Challah Buns)
Equipment
Ingredients
- 4 ½ to 5 cups all purpose flour, divided
- 2 ¼ teaspoons (1 packet or ¼ ounce) instant rapid rise yeast
- 2 teaspoons kosher salt
- ¾ cup lukewarm water 120 to 130 degrees F
- ½ cup honey
- 6 tablespoons vegetable oil, plus extra for greasing bowl
- 3 large eggs, room temperature, plus 1 additional egg for coating the top of the dough
- 1 large egg yolk, room temperature
- ½ tablespoon sesame seeds, poppy seeds, or other seeds for topping
Instructions
- In the bowl of a stand mixer fitted with a dough hook, combine 2 cups flour, yeast, and salt. Lightly mix together with a spoon.
- Add lukewarm water, honey, 6 tablespoons vegetable oil, 3 eggs, and 1 egg yolk. Mix on medium-low speed until combined, scraping the sides of the bowl as needed. You will have a wet batter.
- Add another 2 ½ cups of flour and continue to mix on medium speed until the dough thickens and becomes sticky, about 15 to 20 minutes. Again, scraping the sides as needed.
- Remove the bowl from the stand mixer. Prepare a large, clean area by covering it with ¼ to ½ cup of flour so the dough doesn’t stick. Scoop out the dough and knead by hand for another 10 to 20 minutes, or until the dough absorbs all the flour and is smooth, elastic, and minimally sticky. (To test the dough, use your finger to poke the side of the dough, if it springs back quickly, it is kneaded enough. However, if the indentation remains and does not spring back, continue kneading until it does.)
- Grease a large bowl with 1 tablespoon of additional vegetable oil. Add the dough and coat it in the oil on all sides. Cover the bowl with plastic wrap or a clean kitchen towel and allow the dough to rest on the counter until it has risen to double its size, about 2 hours. (The speed of rising will depend on the warmth of your kitchen. It could take the dough 2 to 3 hours to double in size.)
- Once doubled, remove the dough from the bowl and split into 10 even-sized pieces. Roll each into a ball.
- Working with one ball at a time, split the ball in two equal parts. Roll the halves into two 12-inch long strands. Twist the two strands around one another. Then, swirl the entire twist into a spiral ball by rolling the bottom up into itself.
- Tuck the remaining end under the roll of dough to complete the circle. Repeat with the rest of the dough balls until you have 10 spiral rolls.
- Carefully transfer each roll of dough onto two parchment-lined baking sheets. Cover loosely with plastic wrap or clean kitchen towel and let rise in a warm place for another 1 to 2 hours, or until it is about 1 ½ times its original size.
- Towards the end of the rising time, preheat oven to 350 degrees F. Make sure there is space above each rack for the rolls to rise.
- In a small bowl, whisk 1 egg. Brush egg liberally over the top of each risen roll, covering the entire top. (You may not use the entire egg.) Sprinkle the tops of the rolls with sesame seeds, poppy seeds, or other seeds, if desired.
- Double the baking sheets by placing the baking sheets with the dough, on top of another same-sized baking sheet. This will help protect the bottom of the bread from browning too quickly. Place the doubled baking sheets in the oven.
- Bake for 15 to 20 minutes, or until golden brown on top and a thermometer inserted in the middle reaches 190 to 200 degrees F. Remove from the oven and place on a cooling rack to cool completely before storing.
- To turn these rolls into buns, simply slice them in half horizontally and top with your favorite meats and vegetables.
Notes
- This recipe makes 10 4-inch rolls. If you'd like smaller dinner rolls, divide the dough into 15 balls instead of 10.
- Store yeast in a cool, dry place. Check its expiration date before using. If it is expired, throw it out and buy fresh.
- Spray your measuring cup with nonstick spray before measuring the honey. This will prevent it from sticking.
- Make sure the water is between 120 and 130 degrees F. If it is too cool, it won't activate the yeast, but if it is too warm, it will kill the yeast.
- Make sure to rise the dough in a warm, draft-free area. However, if it is too warm, the dough will stop rising and you won't get a nice, fluffy challah roll. The ideal environmental temperature for rising is between 78 and 80 degrees F.
- See the step-by-step photos in the post above for additional visual help in braiding the challah rolls.
Nutrition
Want more recipes like this delivered right to your inbox? Be sure to subscribe above and never miss a thing!

Mike L. says
These are absolutely amazing and very versatile. Love them with sesame or poppy seeds, or even plain. In addition to having them as an alternative to conventional dinner rolls at Thanksgiving dinner, we've also used them as buns for a burger or barbecue chicken sandwich.
Alana Lieberman says
Sounds like a fantastic idea! Thanks for sharing 🙂