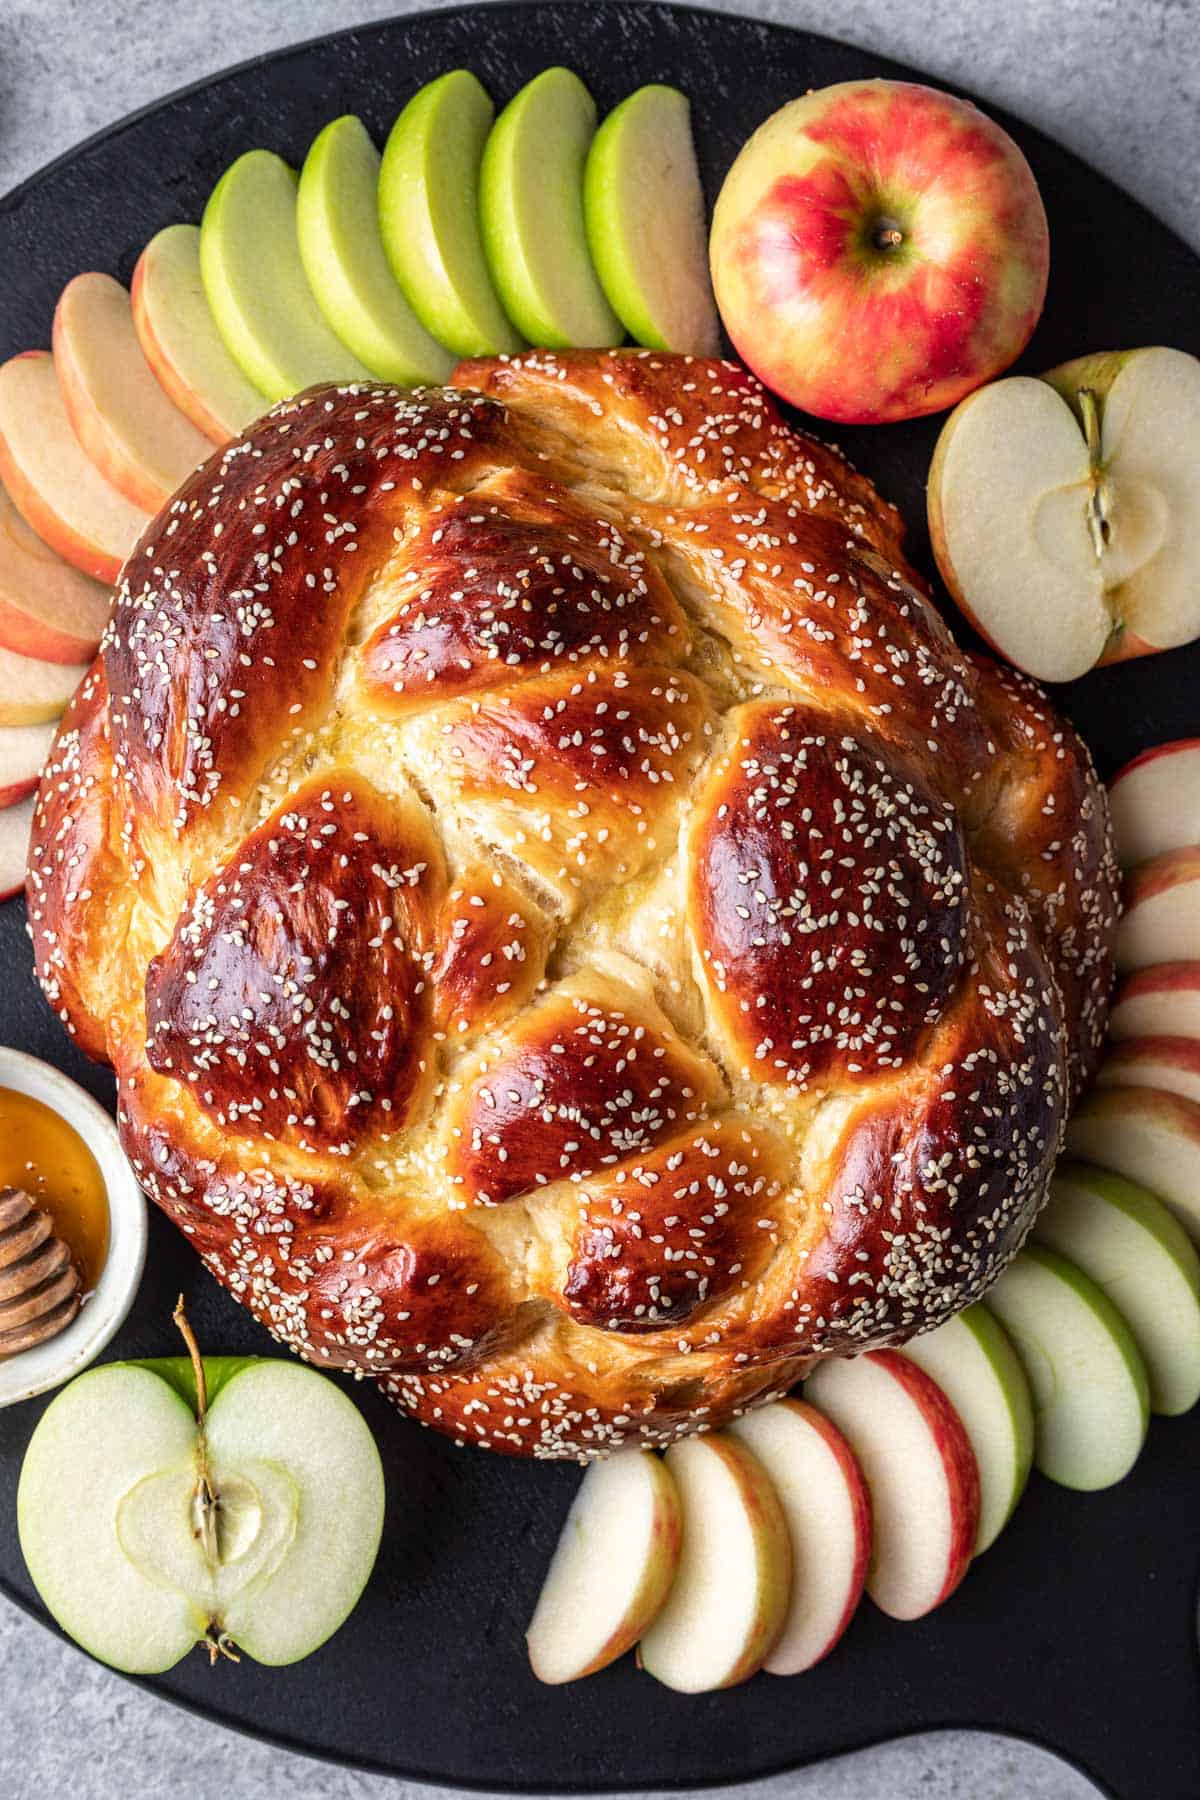
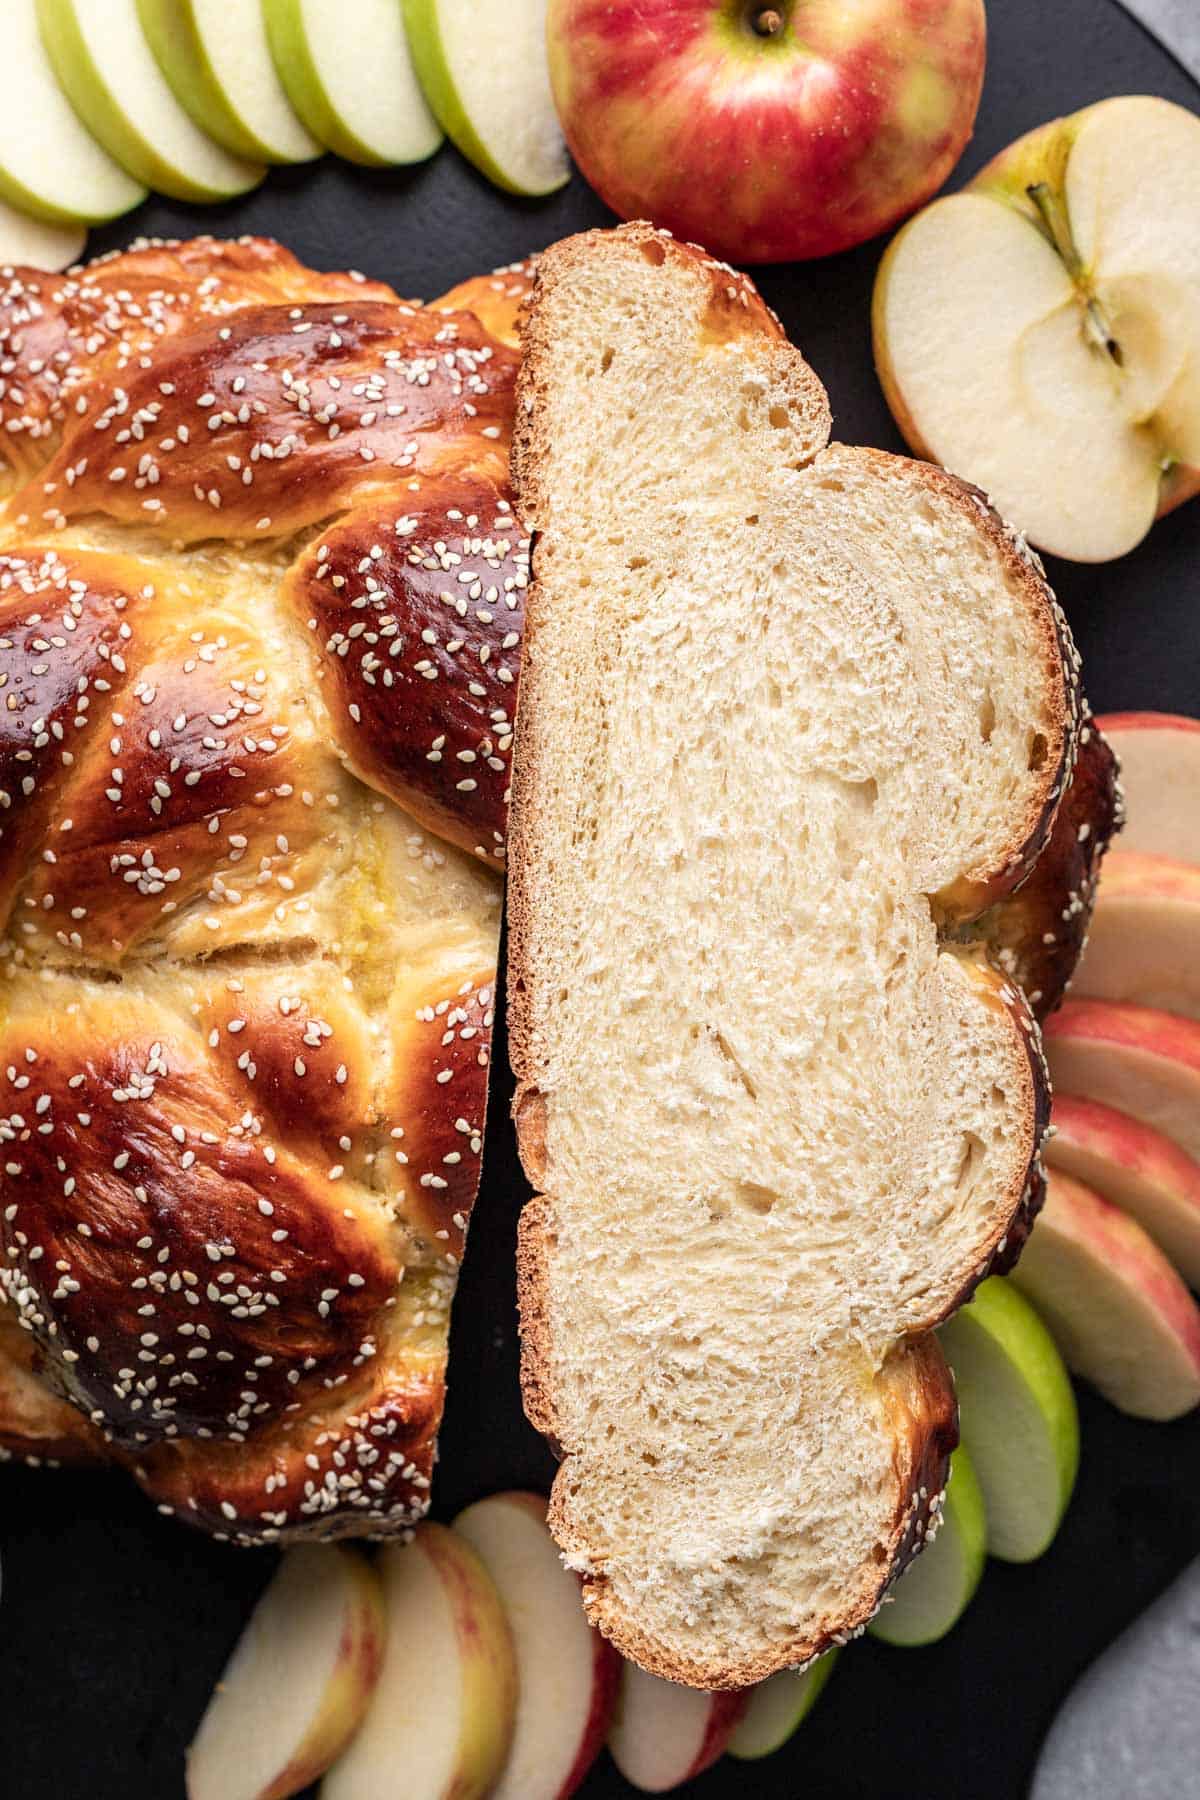
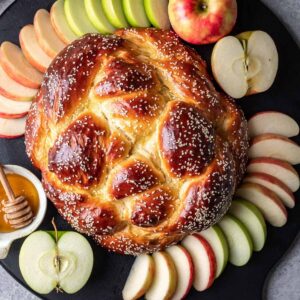
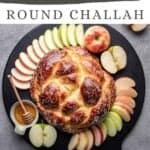
This soft egg enriched round challah is the perfect holiday challah to serve in celebration of Rosh Hashanah or even in honor of the sabbath. Learn how to braid a round 4-strand challah at home with my easy to follow step by step photos. Then, enjoy warm, fresh baked challah that tastes just like the one from your favorite bakery!
Jump to:
📋 About the Recipe
- Traditionally round for Rosh Hashanah. In this recipe, I will teach you how to braid a round challah loaf to celebrate Rosh Hashanah (the Jewish New Year). A round challah is symbolic for many reasons, but most notably because it represents the cyclical year (beginning to end, continuity of years, changes of the seasons, etc.).
- Just 7 ingredients. Making your own spiral challah at home for Rosh Hashanah or even Shabbat, Yom Kippur, Bar Mitzvahs, and other Jewish holidays and celebrations couldn't be more simple. You likely have everything you need already in your kitchen.
- Easy to follow. Learning how to braid round challah may seem daunting, but it is very simple. Follow my visual step by step photos to make the process even easier.
🛒 Ingredients
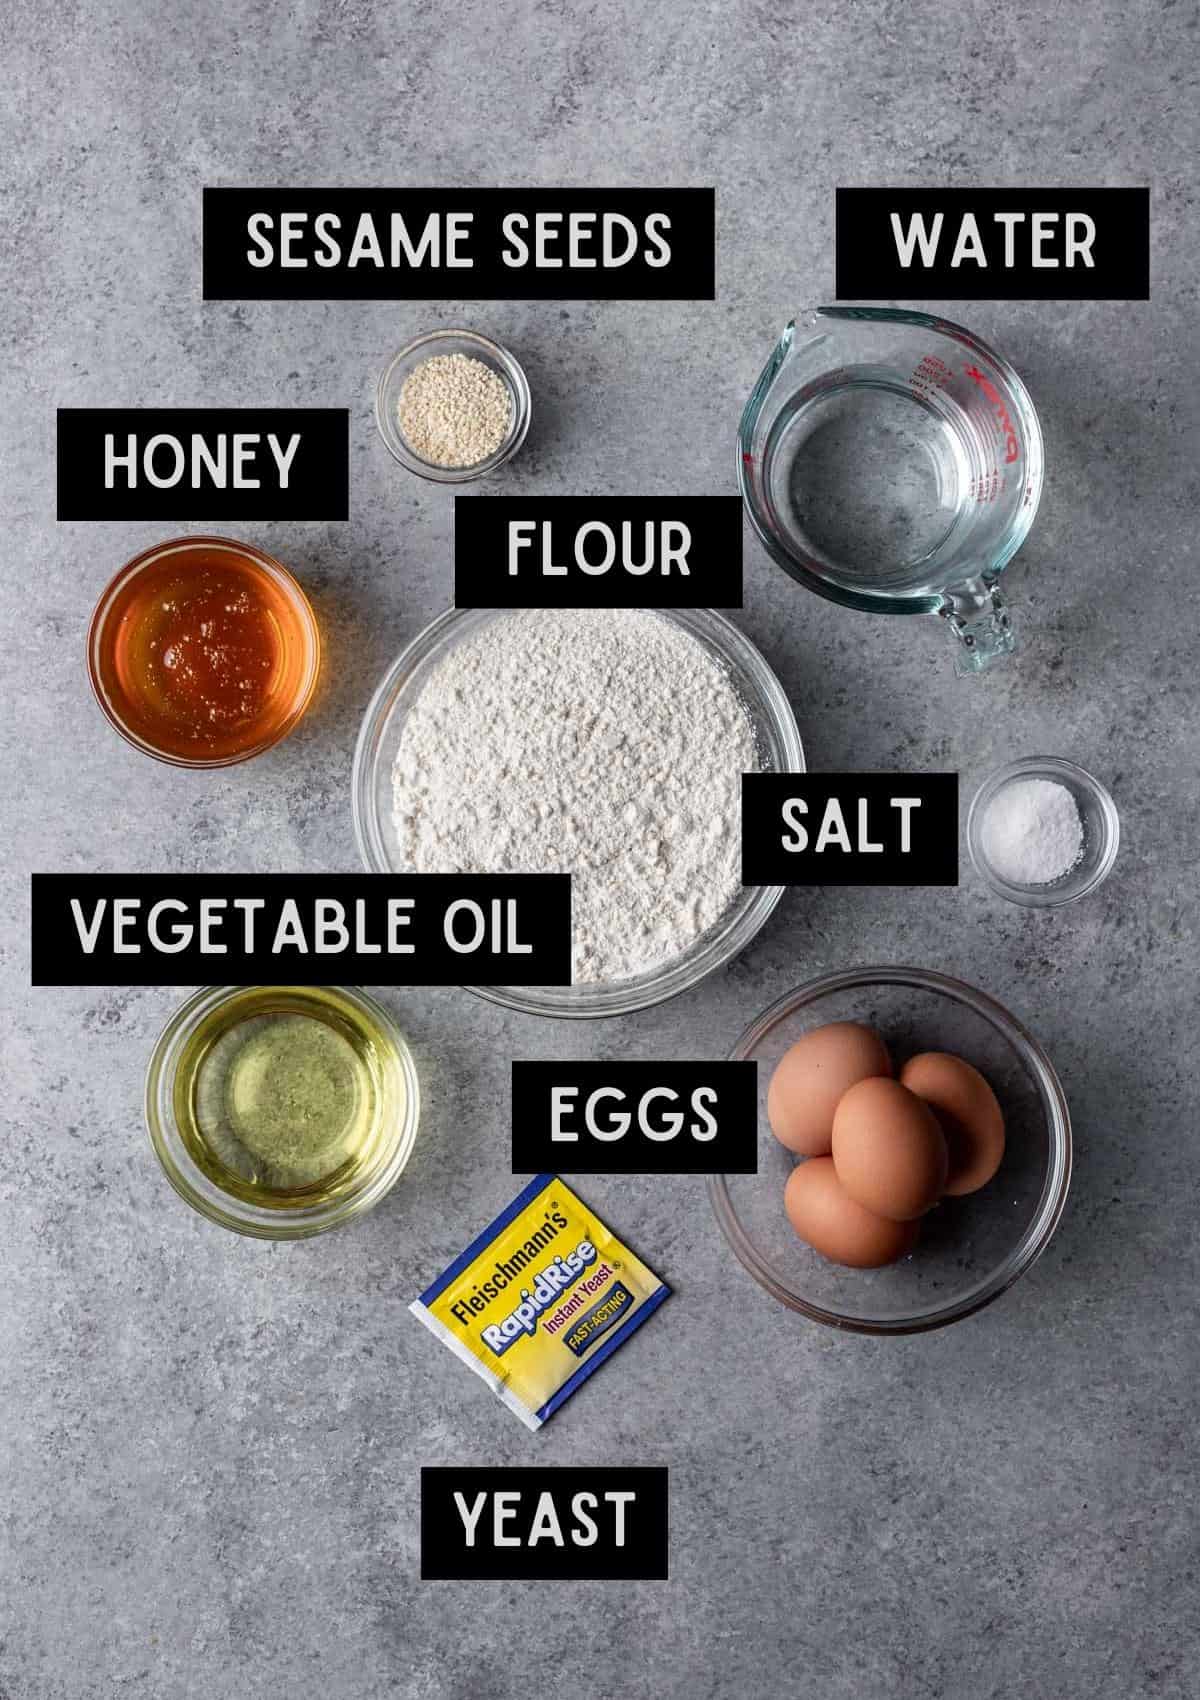
A few notes about the ingredients:
- Flour - The only flour I recommend using in this recipe is all purpose flour. It creates the most traditional, light and fluffy challah. I have not tested this round challah recipe using any gluten free flours and cannot recommend or advise.
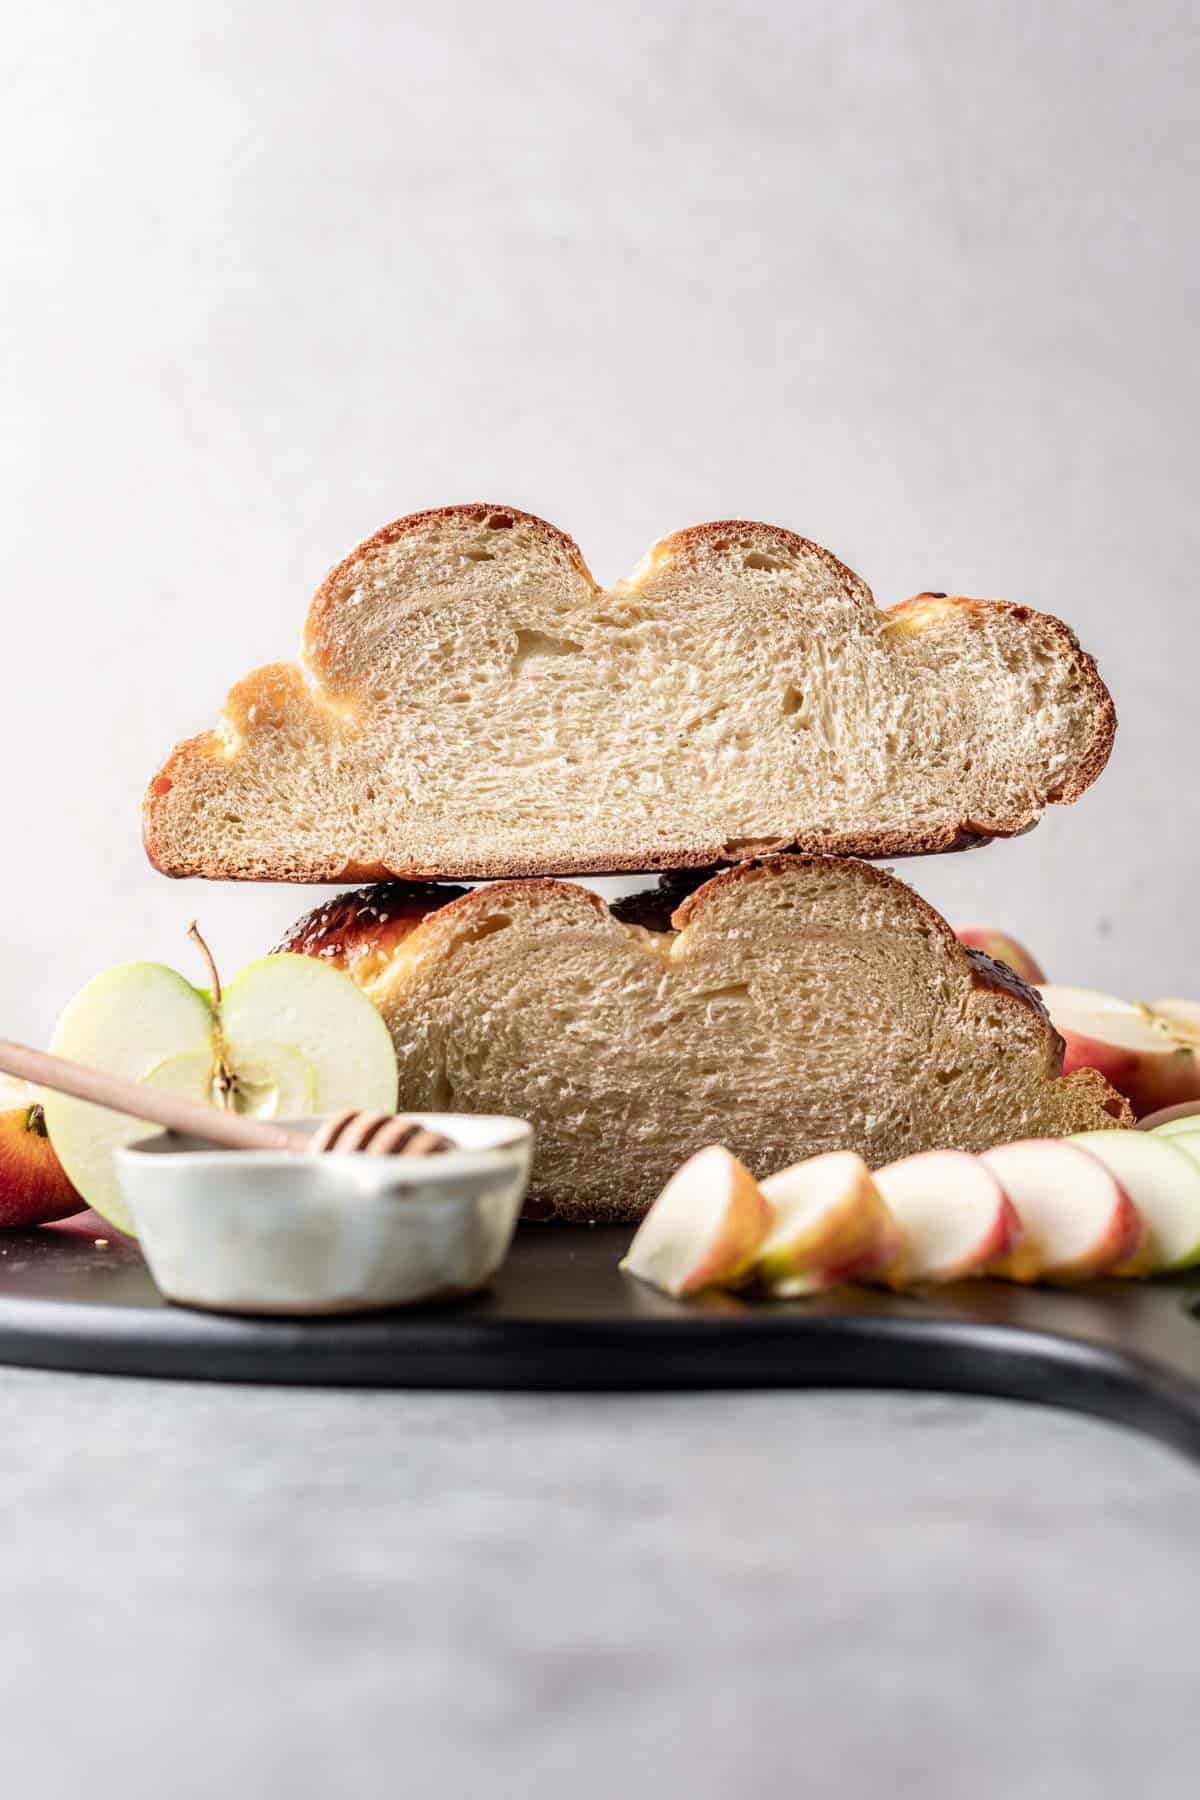
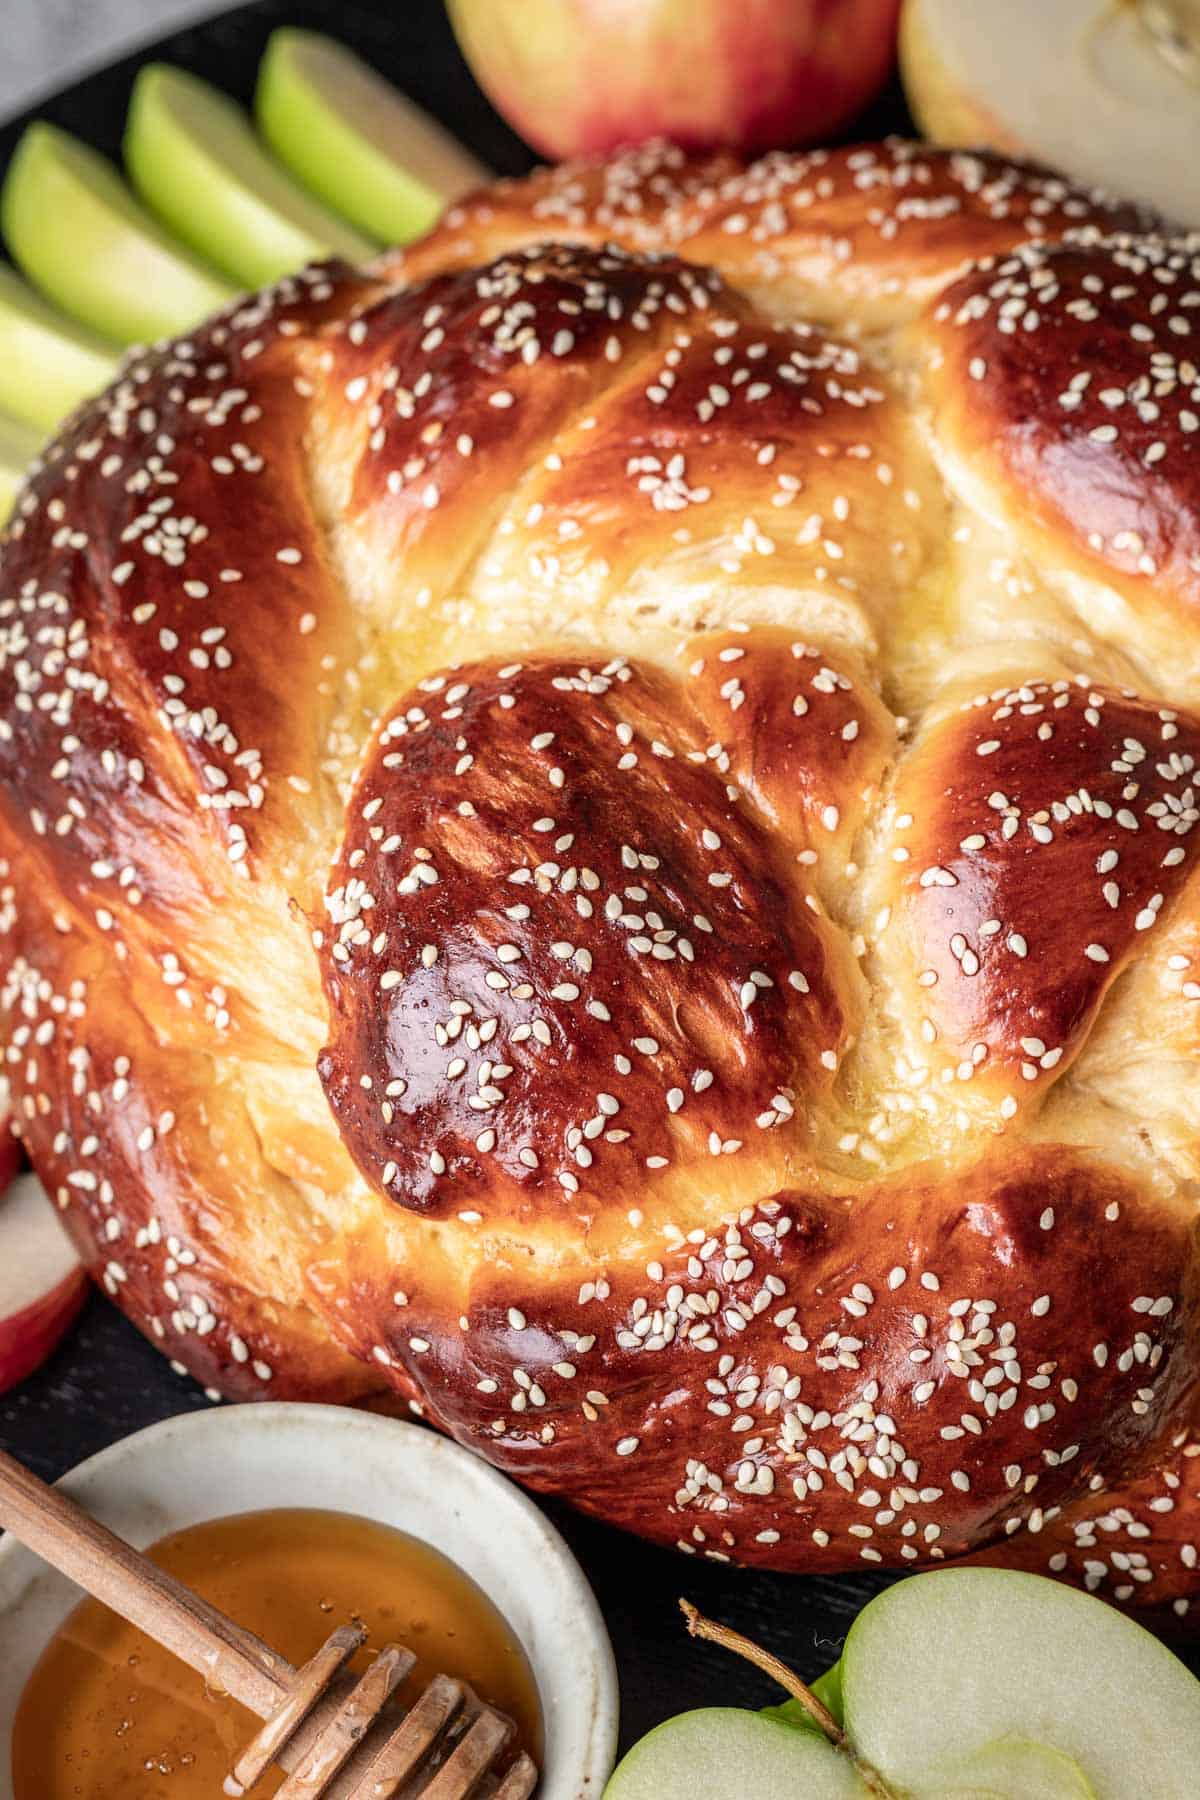
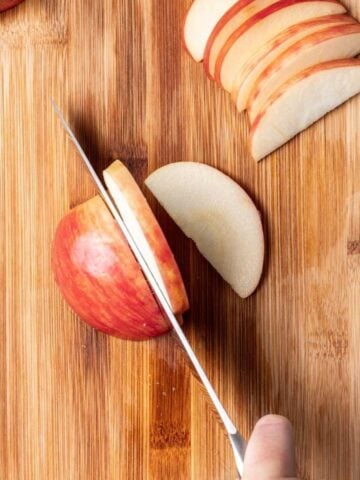
- Honey - This loaf is lightly sweetened with honey because it is customary to eat a sweeter challah to symbolize a "sweet new year." It is also tradition to eat apples dipped in honey for Rosh Hashanah too.
- Yeast - This round challah recipe is developed using instant yeast. It is the most convenient yeast to use in home baking because it is fast acting and does not require any "blooming." Make sure to use water between 120 and 130 degrees F. If it is too cool, it won't activate the yeast, but if it is too warm, it will kill the yeast, and the dough will not rise.
- Eggs - Challah bread is unique because it is traditionally a braided loaf rich in flavor from the use of eggs. For the best flavor, I use both whole eggs and an additional egg yolk.
- Vegetable oil - A neutral oil helps tenderize the challah dough and lend extra moisture and flavor to the bread. I do not recommend substituting this oil with coconut oil or olive oil because this will alter the flavor and texture.
📓 Instructions
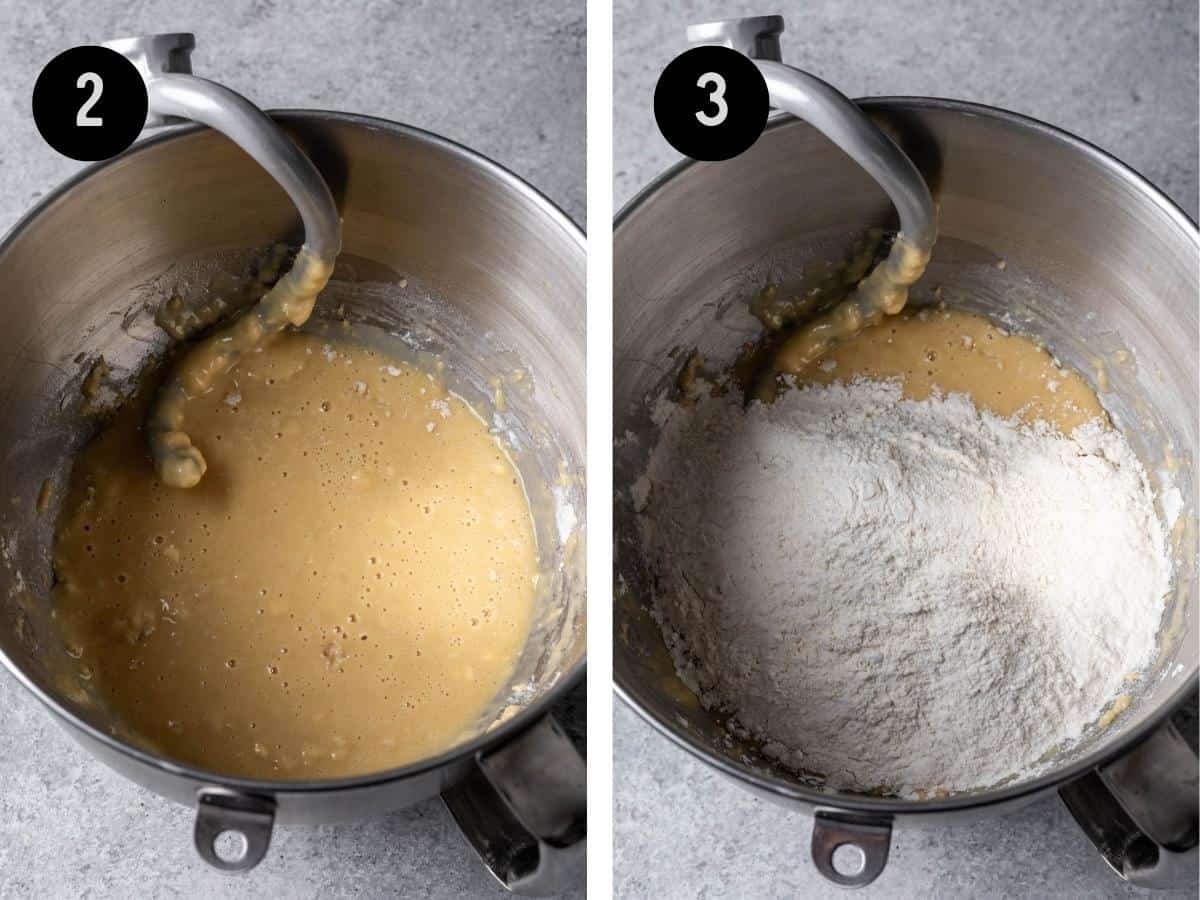
- Mix together the dry challah ingredients. In the bowl of a stand mixer, lightly mix together 2 cups of the all purpose flour, instant yeast and kosher salt.
- Add in the wet ingredients. Once the flour, yeast, and salt is combined, add in the lukewarm water, eggs, honey, and vegetable oil. Fit the stand mixer with the dough hook attachment and mix the wet challah ingredients into the dry ingredients to form a wet batter.

- Add 2 more cups of flour. Mix again on medium speed for 15 to 20 minutes, or until the challah dough thickens and becomes sticky.
- Knead the dough. Using a baking spatula, remove the challah bread dough from the stand mixer and place on a clean, floured work surface to prevent the dough from sticking. Knead the challah by hand for an additional 10 to 20 minutes, or until the dough is smooth, elastic and is slightly tacky, but the challah does not stick to your hands.
To test if your challah dough is kneaded enough, use your finger to poke the side of the dough. If the dough springs back quickly, it is ready. If it does not and the indentation remains in the dough, continue kneading until the challah springs back into form.
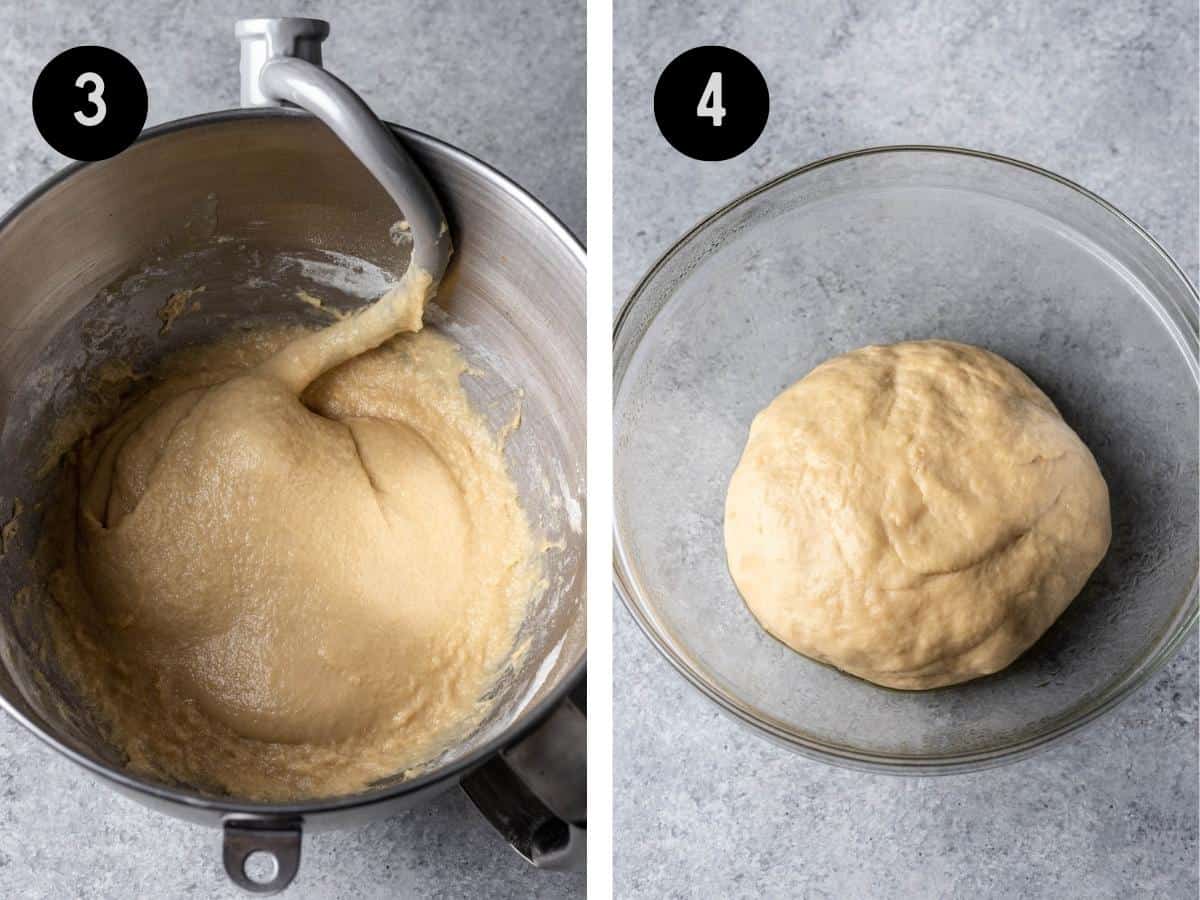
- Rise the challah until doubled in size. Grease a large mixing bowl with 1 tablespoon of vegetable oil. Add the kneaded dough into the bowl and coat it in the oil on all sides. Cover the challah with plastic wrap and place in a warm spot until the rounded challah dough doubles in size. Depending on the warmth of your kitchen, this can take 2 to 3 hours.
- Split the dough into 4 even-sized pieces. Once the challah dough has doubled in size, remove the dough from the mixing bowl and split into 4 equal sized portions. Roll each portion into a round ball.
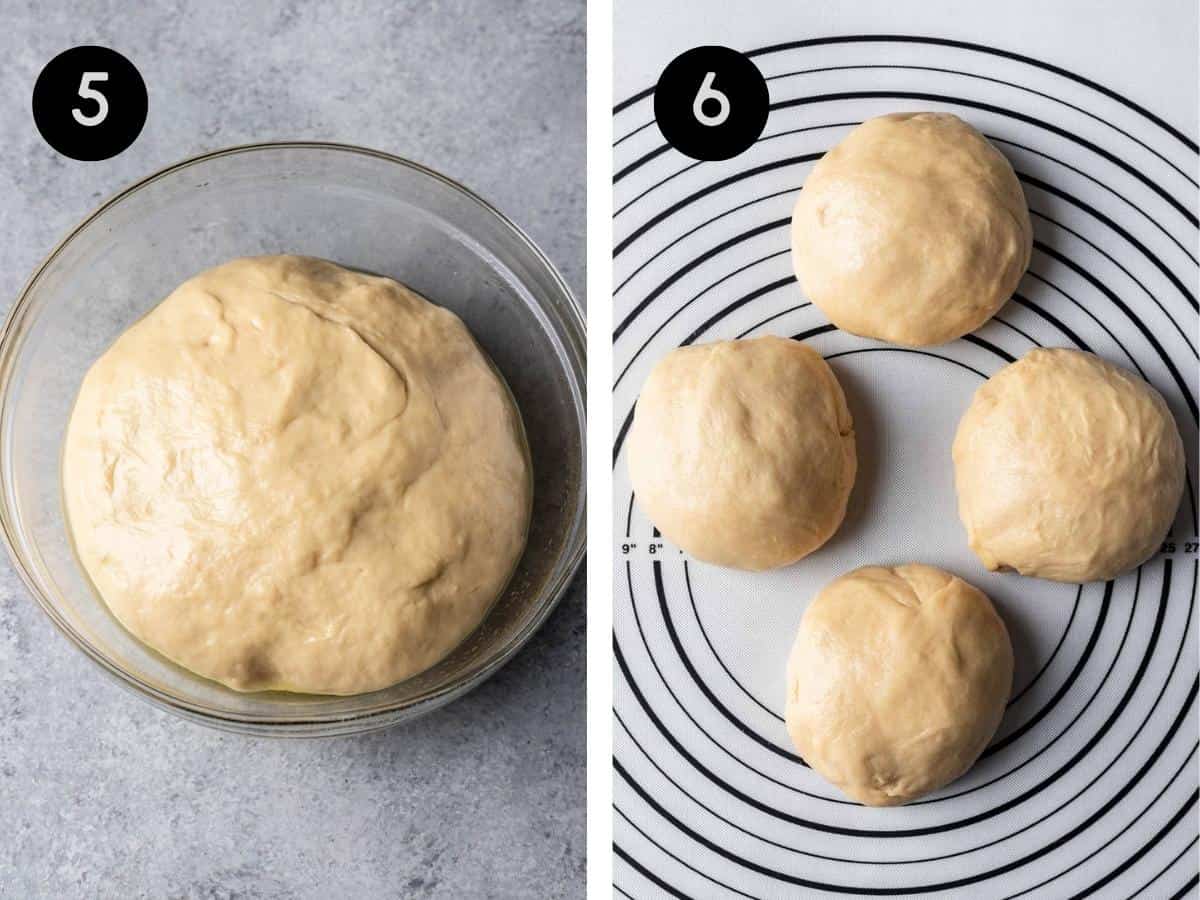
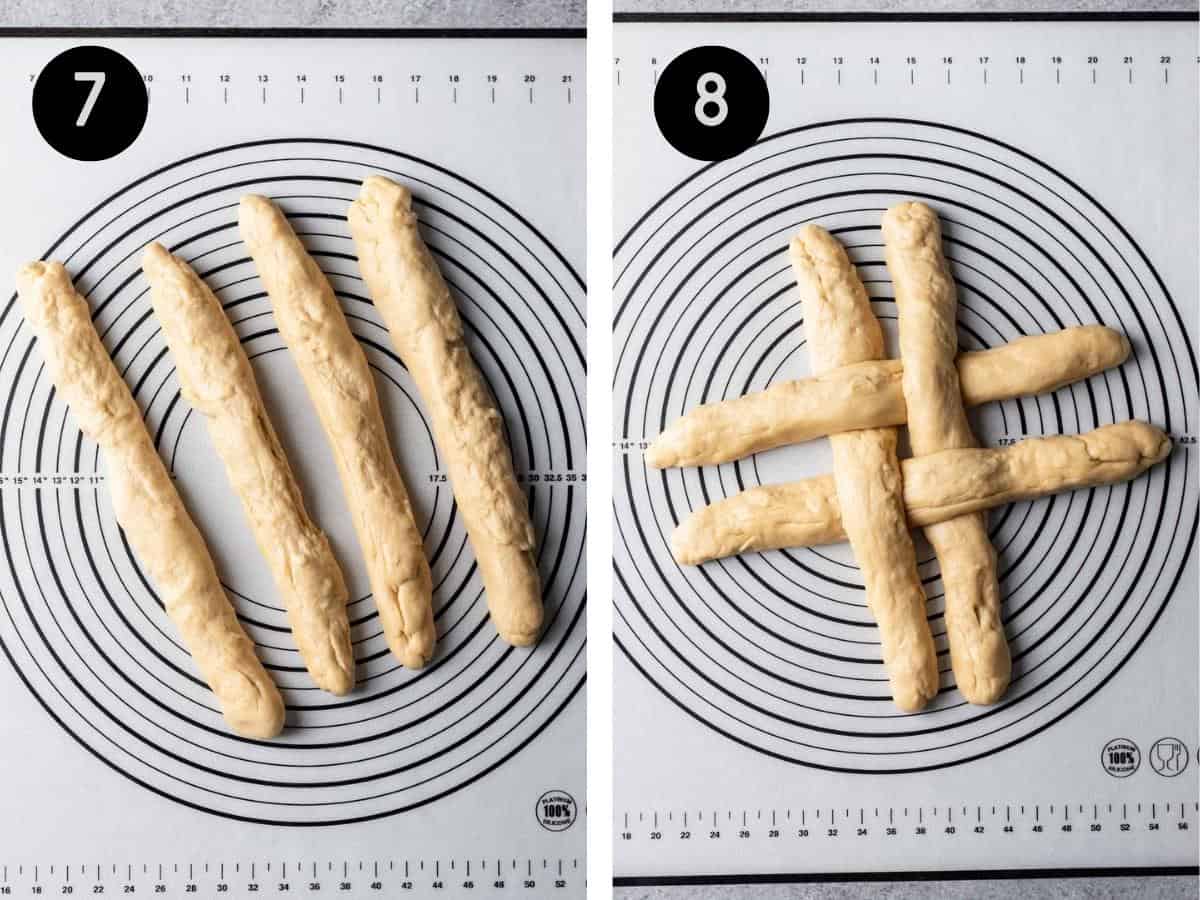
- Create 4 strands. Roll each round ball into 4 long strands, about 15 inches in length. Take time to make each strand equal in length and size. This will ensure you have an easier time braiding the round challah.
- Arrange the 4 stands into a pound sign or hashtag symbol. This is the crucial first step to braiding a round challah.
To do this, pull back the top right vertical strand and tuck the top right horizontal strand underneath. Then, pull back the bottom left vertical strand and tuck the bottom left horizontal strand underneath. The crisscrossed strands should be almost touching, to create a tight center for the round challah.
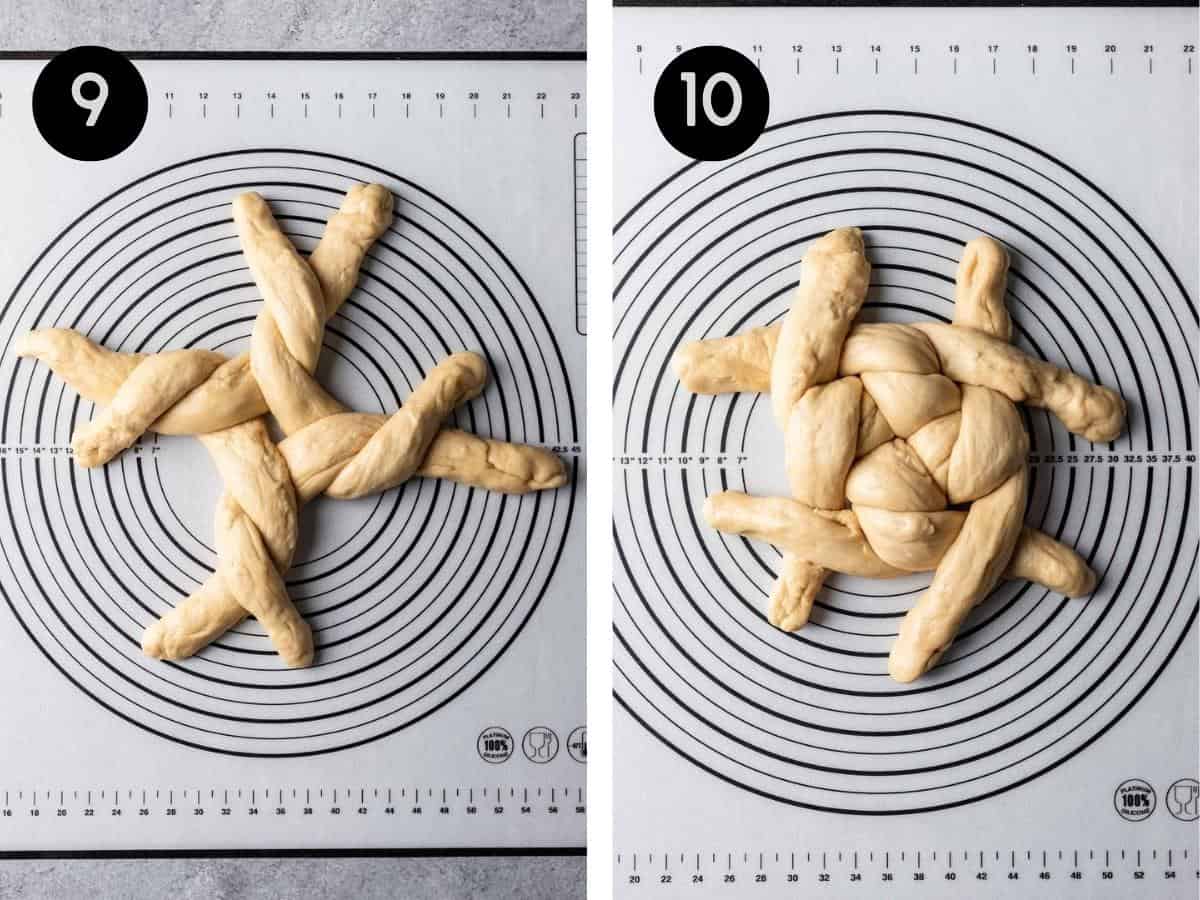
- Cross the strands counterclockwise. Starting with the bottom right strand, place it overtop the strand to its right. Continue counterclockwise until all strands are crossed once. When done, there should be 4 pairs of twisted strands.
- Cross the strands again clockwise. Beginning with the bottom right pairing, take the strand that is underneath and pass it over the strand directly to its left. Continue moving clockwise this time until each strand is almost entirely braided into a round shape.
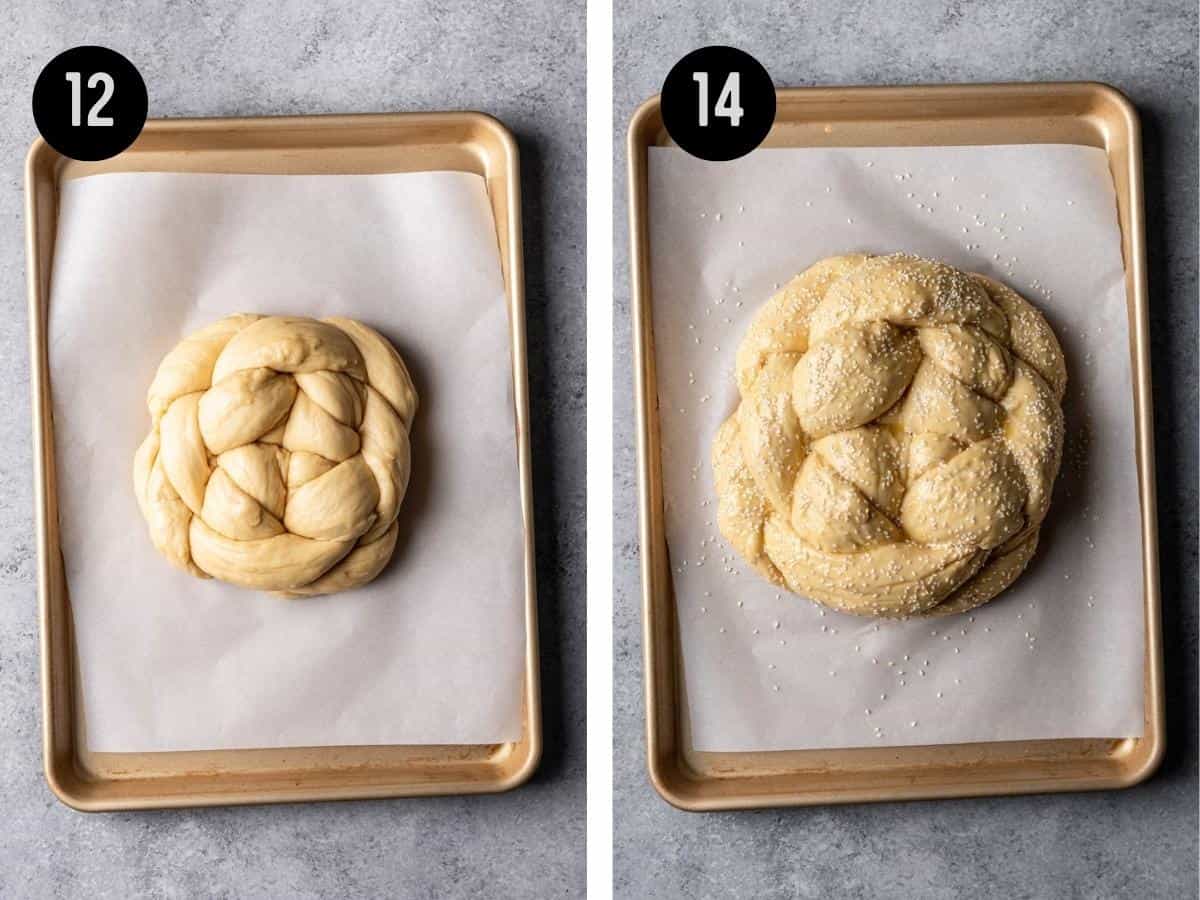
- Tuck the remaining ends under the bottom of the challah loaf. This will create your final, braided round challah perfect for Rosh Hashanah!
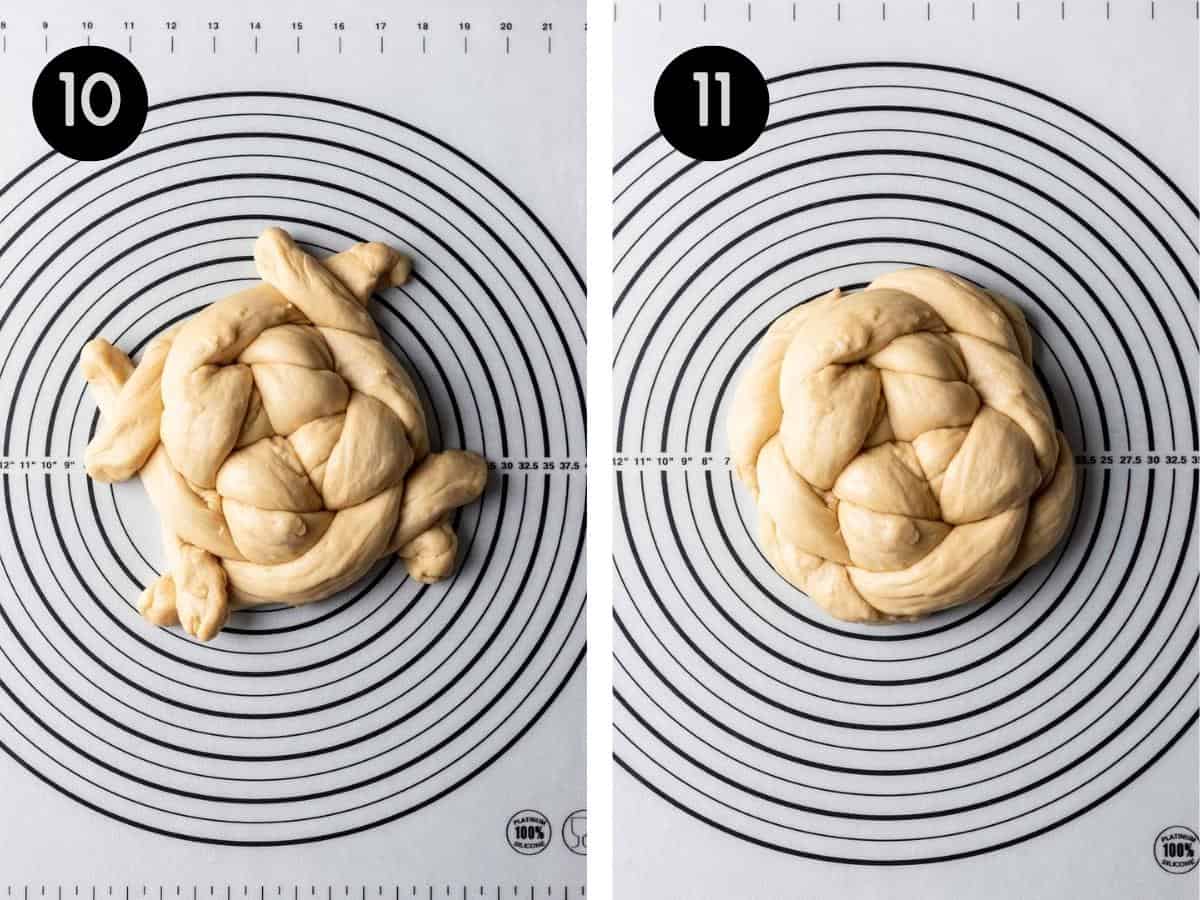
- Transfer to a baking sheet and rise once more. Cover loosely with plastic wrap and let rise in a warm place for another 1 to 2 hours, or until it is still round, but about 1 ½ times its original size.
- Preheat the oven. Near the end of the rising time, preheat the oven to 350 degrees F and set your oven rack to the middle of the oven. This will ensure your Rosh Hashanah challah has enough space to rise.
- Brush with an egg wash and sprinkle with sesame seeds. In a small bowl, whisk 1 egg. Brush egg liberally over the top of the risen dough, covering the entire top. (You may not use the entire egg.) Sprinkle the top with sesame seeds or other toppings, if desired.
- Double the baking sheet and bake. I recommend placing the baking sheet on top of a second same-sized baking sheet to prevent the bottom of the challah from browning too quickly. Then, bake for 20 minutes, remove from the oven, cover the top with foil to prevent the outside from over-browning and bake for an additional 25 to 35 minutes. The round challah will be ready when the internal temperature of the loaf reaches 190 to 200 degrees F.
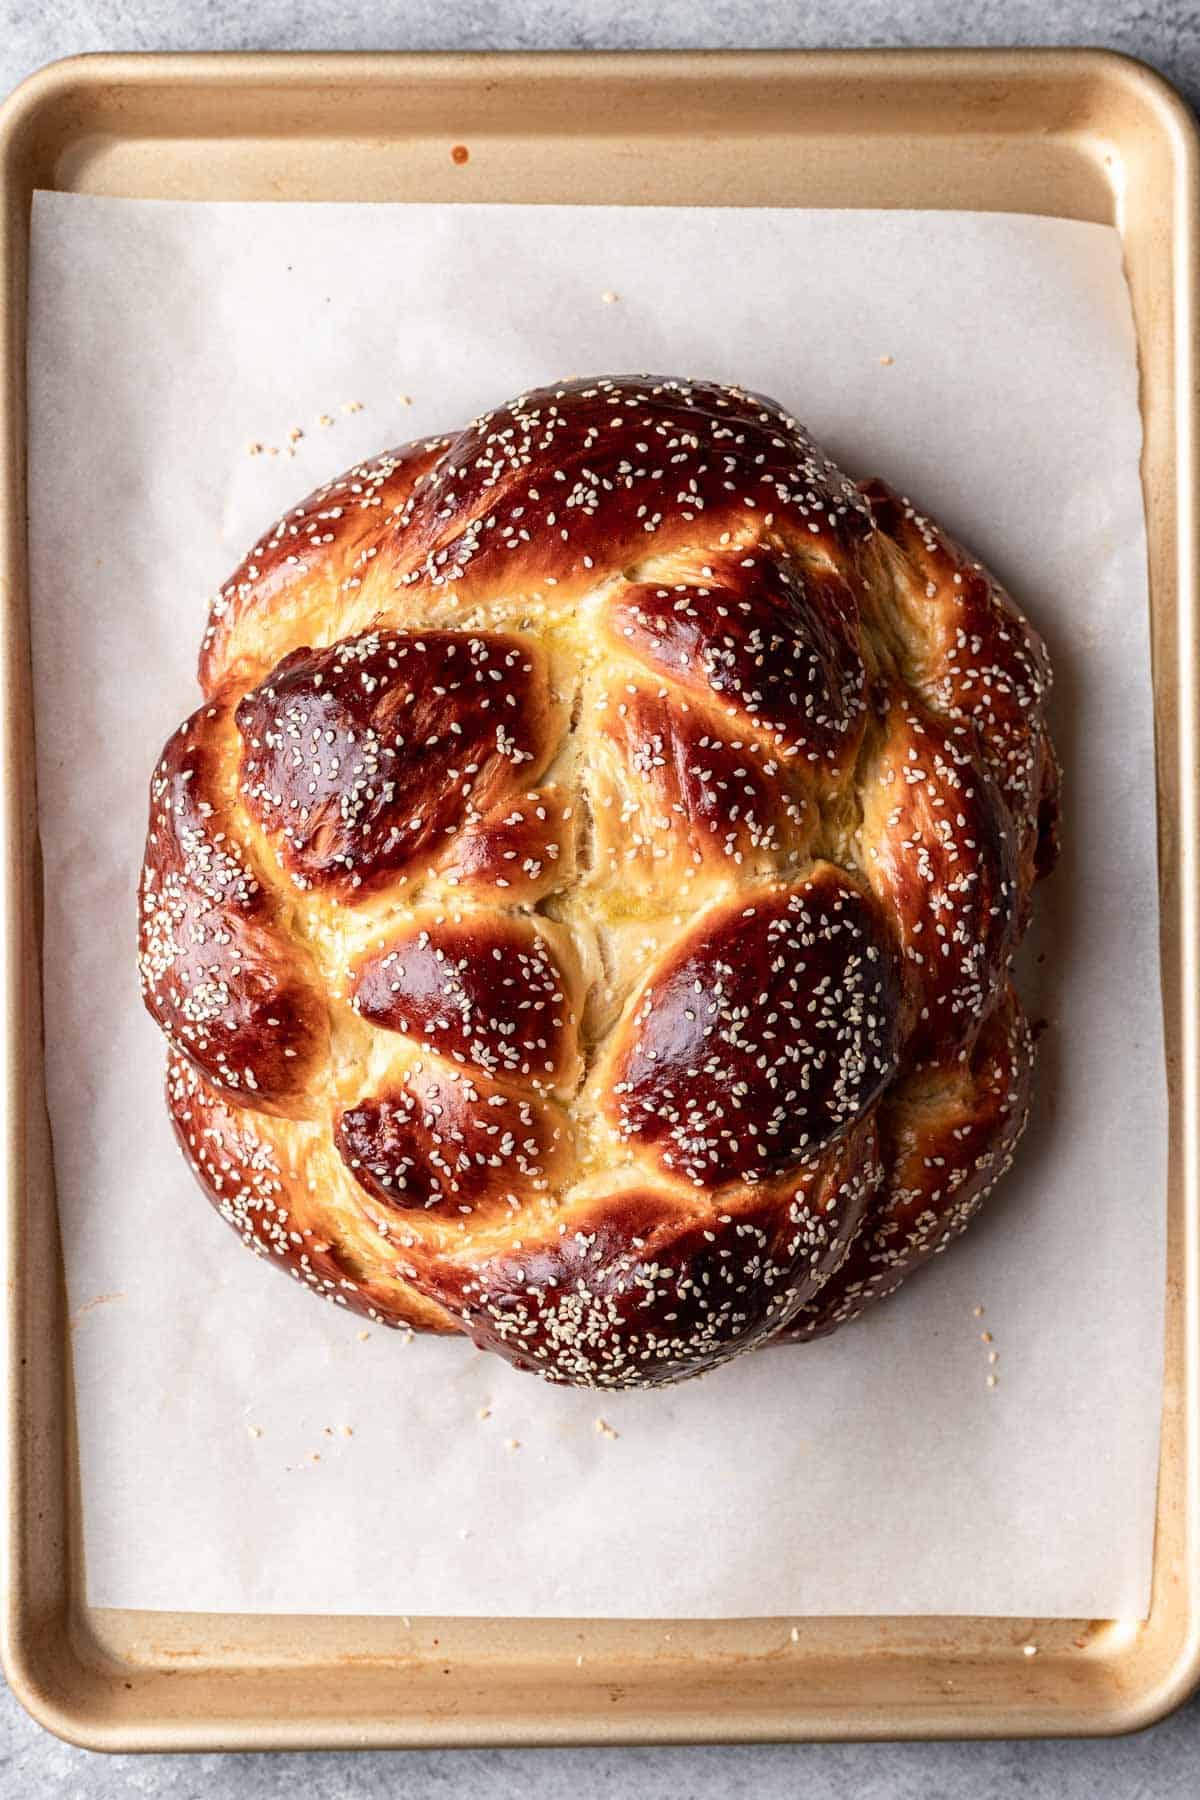
- Cool on a cooling rack, then enjoy! After the round challah has baked through, remove from the oven and transfer to a cooling rack to cool completely. Once cool, enjoy for Rosh Hashanah or store for later.
⁉️ Substitutions and Alterations
There aren't many substitutions or alterations to make in this challah recipe because it already uses such basic ingredients that are essential to home baking. You can, however, change the topping on top of the challah.
I like to sprinkle the top of my round challah for Rosh Hashanah with sesame seeds, but you can omit the sesame seeds completely, or choose a different topping like another seed, herbs, nuts, etc.
❄️ How to Store
To store: Store leftover challah in an airtight zip top bag or container at room temperature for up to 4 days. Refrigeration is not recommended.
To freeze: Tightly wrap the Rosh Hashanah challah in plastic wrap, then transfer it to a freezer safe zip top bag or container. Freeze for up to 3 months for optimal taste and texture preservation. Allow the round challah to thaw at room temperature, then enjoy as usual.
🔍 FAQs
The c in challah is silent. It is pronounced "haa-luh," where the first "h" sounds like you're clearing your throat. You may see challah spelled a number of ways, but the pronunciation is always the same.
Although challah and brioche are both rich quick breads, challah and brioche breads are not the same. The biggest difference between the two is that brioche is made with dairy and challah bread is not. Additionally challah is kosher and brioche is not always.
Yes, follow recipe steps 1 through 5, then place the challah into the refrigerator to rise overnight as opposed to 2 to 3 hours in a warm spot. The next morning, remove the challah from the refrigerator, allow it to come to room temperature, then carry on with the remaining steps.
Yes, challah dough can be over proofed if it is left to rise in a warm, draft free area for longer than recommended. If necessary, stick the challah in the refrigerator to rise overnight instead (on the first rise, not the second). This will prevent your bread from over proofing and works great if you need to give yourself some extra time.
💭 A Few More Tips
- Check the expiration date of your yeast! If you use yeast that is expired or no longer active, the challah dough will have a very difficult time rising and will not be nearly as fluffy as a challah baked with fresh, active yeast.
- The ideal rising temperature for this round Rosh Hashanah dough is between 78 and 80 degrees F. If your house is colder, the challah will still double in size, but will take longer. In the colder months, try proofing the dough in the Instant Pot.
- Spray your measuring cup with oil when measuring honey. This will prevent sticking and make for an easier cleanup!
🍴 Related Recipes

Share your cooking with me! If you make this recipe, I'd love to know! Tag @yourhomemadehealthy on Instagram or leave a comment with a rating and some feedback at the bottom of this page!
Round Challah (for Rosh Hashanah)
Equipment
Ingredients
- 4 ¼ cups all purpose flour divided
- 2 ¼ teaspoon (1 packet, or ¼ ounce) instant rapid rise yeast
- 2 teaspoons kosher salt
- ¾ cup lukewarm water 120 to 130 degrees F
- ½ cup honey
- 6 tablespoons vegetable oil plus extra for greasing bowl
- 3 large eggs room temperature, plus 1 additional for coating the top of the dough
- 1 large egg yolk room temperature
- ½ tablespoon sesame seeds or other seeds for topping
Instructions
- In the bowl of a stand mixer fitted with a dough hook, combine 2 cups flour, yeast, and salt. Lightly mix together with a spoon.
- Add lukewarm water, honey, vegetable oil, eggs, and egg yolk. Mix on medium-low speed until combined, scraping the sides of the bowl as needed. You will have a wet batter.
- Add another 2 cups of flour and continue to mix on medium speed until the dough thickens and becomes sticky, about 15 to 20 minutes. Again, scraping the sides as needed.
- Remove the bowl from the stand mixer. Prepare a large, clean area by covering it with ¼ cup of flour so the dough doesn’t stick. Scoop out the dough and knead by hand for another 10 to 20 minutes, or until the dough absorbs all the flour and is smooth, elastic, and minimally sticky. (To test the dough, use your finger to poke the side of the dough, if it springs back quickly, it is kneaded enough. However, if the indentation remains and does not spring back, continue kneading until it does.)
- Grease a large bowl with 1 tablespoon of additional vegetable oil. Add the dough and coat it in the oil on all sides. Cover the bowl with plastic wrap and allow the dough to rest on the counter until it has risen to double its size, about 2 hours. (The speed of rising will depend on the warmth of your kitchen. It could take the dough 2 to 3 hours to double in size.)
- Once doubled, remove the dough from the bowl and split into 4 even-sized pieces. Roll each into a ball.
- Roll each ball into 4 long, even strands. Each about 15 inches long.
- Create a lattice with the dough by arranging the strands to form a “hashtag” (#) with 2 strands laying horizontally and 2 strands laying across vertically. Pull back the top right vertical strand and tuck the top right horizontal strand underneath. Then, pull back the bottom left vertical strand and tuck the bottom left horizontal strand underneath. The crisscrossed strands should be almost touching, leaving very little space between each one. There should be 2 strands at the top, 2 to the right, 2 at the bottom, and 2 to the left.
- Take the bottom right strand and pass it over the strand to its right. Continue counterclockwise until all strands are crossed once. When done, there should be 4 pairs of twisted strands.
- Beginning with the bottom right pairing, take the strand that is underneath and pass it over the strand directly to its left. Continue moving clockwise this time until each strand is almost entirely braided.
- Tuck the remaining, unbraided, ends under the loaf of dough to complete the circle.
- Carefully transfer the braided dough onto a parchment-lined baking sheet. Cover loosely with plastic wrap and let rise in a warm place for another 1 to 2 hours, or until it is about 1 ½ times its original size.
- Towards the end of the rising time, preheat oven to 350 degrees F. Set your rack in the middle of the oven to ensure plenty of space for the challah to rise.
- In a small bowl, whisk 1 egg. Brush egg liberally over the top of the risen dough, covering the entire top. (You may not use the entire egg.) Sprinkle the top with sesame seeds or other toppings, if desired.
- Place the baking sheet, with the dough, on top of another same-sized baking sheet to protect the bottom of the bread from browning too quickly. Place the doubled baking sheet in the oven. Bake for 20 minutes, remove from the oven, and loosely cover the top with foil to prevent the outside from over-browning. Bake for another 25 to 35 minutes, or until a thermometer inserted in the middle reaches 190 to 200 degrees F. Remove from the oven and place on a cooling rack to cool completely before storing.
Notes
- Store yeast in a cool, dry place. Check its expiration date before using. If it is expired, throw it out and buy fresh.
- Spray your measuring cup with nonstick spray before measuring the honey. This will prevent it from sticking.
- If your dough is still sticky after kneading by hand, you can slowly add another ¼ cup of flour, up to an additional ¾ cup (not to exceed a grand total of 5 cups flour overall.)
- Make sure the water is between 120 and 130 degrees F. If it is too cool, it won't activate the yeast, but if it is too warm, it will kill the yeast.
- Make sure to rise the dough in a warm, draft-free area. However, if it is too warm, the dough will stop rising and you won't get a big, fluffy challah. The ideal environmental temperature for rising is between 78 and 80 degrees F.
- See the step-by-step photos in the post above for additional visual help in braiding the challah.
- This recipe requires patience, but it is SO worth it for delicious homemade bread!
Nutrition
Want more recipes like this delivered right to your inbox? Be sure to subscribe above and never miss a thing!
Yochanan c Abraham says
Todah
Nice one
Alana Lieberman says
Thank you!